
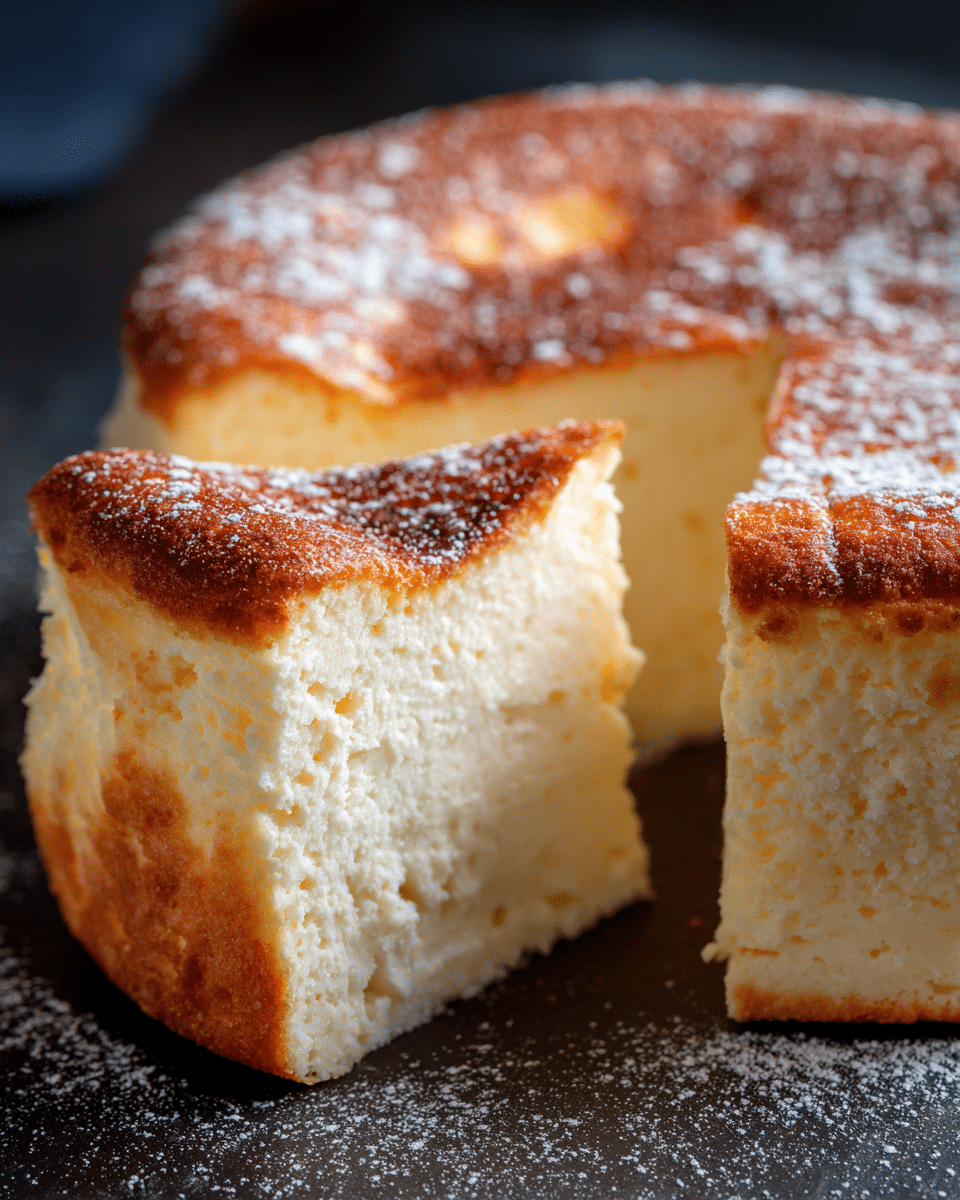
Japanese Cheesecake — also known as cotton cheesecake or soufflé cheesecake — is a delicate, jiggly dessert with the rich flavor of classic cheesecake and the airy softness of sponge cake. It’s beloved for its melt-in-your-mouth texture, gentle sweetness, and cloud-like lift.
Unlike traditional dense Western cheesecakes, this version is made by folding whipped egg whites into a rich cream cheese base and baking it gently in a water bath. The result? A tall, golden-topped cake that’s subtly sweet, lightly tangy, and impossibly fluffy.
Perfect with tea, fresh fruit, or a light dusting of powdered sugar, this cake is a minimalist showstopper for any dessert table.
Ingredients Overview
The secret to Japanese cheesecake lies in the balance of lightness and richness — and every ingredient plays a crucial role.
For the Base:
-
Cream Cheese: The foundation. Use full-fat, block cream cheese for best flavor and structure.
-
Unsalted Butter: Adds richness and helps emulsify the cream cheese mixture.
-
Whole Milk: Thins the batter slightly and helps create a smooth, pourable consistency.
-
Egg Yolks: Contribute to the richness and color.
-
Cake Flour: Gives the cake its delicate, tender crumb. Avoid all-purpose flour, which is too heavy.
-
Cornstarch: Stabilizes the batter and adds silkiness.
-
Granulated Sugar (part 1): Lightly sweetens the yolk mixture.
For the Meringue:
-
Egg Whites: Whipped to soft peaks to create the signature fluffiness.
-
Cream of Tartar or Lemon Juice: Helps stabilize the egg whites during whipping.
-
Granulated Sugar (part 2): Added gradually to the egg whites to form a glossy meringue.
Optional Finishing Touches:
-
Powdered Sugar: For a clean, classic look.
-
Fresh Berries: Strawberries or raspberries pair beautifully.
-
Whipped Cream: Light and simple, perfect for serving.
Step-by-Step Instructions
1. Prep Your Pan & Oven
-
Preheat oven to 320°F (160°C).
-
Line the bottom and sides of a 7-inch or 8-inch round cake pan with parchment paper.
-
Wrap the outside of the pan in foil to prevent water bath leakage.
2. Make the Cream Cheese Base
In a heatproof bowl over a saucepan of simmering water (double boiler), melt together:
-
7 oz (200g) cream cheese
-
¼ cup (60g) unsalted butter
-
⅓ cup (80ml) whole milk
Whisk until smooth, then remove from heat and let cool slightly.
Once lukewarm, whisk in:
-
4 egg yolks
-
1 tsp vanilla extract (optional)
Then sift in:
-
½ cup (60g) cake flour
-
2 tbsp (15g) cornstarch
-
Pinch of salt
Mix until smooth and lump-free.
3. Make the Meringue
In a separate, clean bowl, beat:
-
4 egg whites
-
½ tsp cream of tartar or 1 tsp lemon juice
Once foamy, gradually add:
-
½ cup (100g) granulated sugar
Beat to soft-to-medium peaks. The meringue should be glossy and hold a slight curl.
4. Fold and Combine
Gently fold one-third of the meringue into the cream cheese batter to loosen it.
Then fold in the remaining meringue in two additions, using a spatula and light circular motions. Do not overmix — keep the batter airy.
5. Bake in a Water Bath
Pour the batter into the prepared pan. Tap gently to remove large air bubbles.
Place the cake pan into a larger pan and fill the outer pan with hot water (about 1 inch deep).
Bake at 320°F (160°C) for 20 minutes, then lower the temperature to 285°F (140°C) and bake for another 40–50 minutes.
The cake should be golden on top and set but still jiggly in the center.
6. Cool Slowly
Turn off the oven and leave the cake inside with the door slightly ajar for 15–20 minutes.
Remove from oven and water bath, then let cool to room temperature in the pan.
Chill for 1–2 hours before removing and slicing for clean edges.
Tips, Variations & Substitutions
-
Use Room Temperature Ingredients: Especially for the eggs and cream cheese — this ensures a smooth, lump-free batter.
-
Whip Egg Whites Properly: Avoid overbeating. Medium peaks provide the perfect rise.
-
Water Bath Must Stay Hot: Replenish with hot water if needed to ensure a gentle, moist bake.
-
No Cake Flour? Make your own by substituting 1 cup all-purpose flour minus 2 tbsp, plus 2 tbsp cornstarch.
-
Add Citrus Zest: Lemon or yuzu zest brings brightness to the flavor.
-
Mini Cheesecakes: Divide into ramekins and adjust baking time (25–30 minutes at 300°F).
Serving Ideas & Occasions
Japanese cheesecake is subtle and elegant — perfect for light desserts or afternoon tea. Enjoy it with:
-
A dusting of powdered sugar and fresh mint
-
Sliced strawberries or raspberries
-
A light fruit compote or citrus glaze
-
Green tea or Earl Grey on the side
Serve it at:
-
Baby showers
-
Mother’s Day brunch
-
Elegant dinner parties
-
Japanese-themed meals
Nutritional & Health Notes
This cheesecake is naturally lower in sugar and fat than dense American versions. One slice (1/8 of the cake) has roughly:
-
Calories: ~190
-
Fat: ~12g
-
Carbs: ~14g
-
Protein: ~5g
It’s rich in protein from eggs and cream cheese, and low in added fat thanks to its oil-free, flour-based structure.
For lighter options:
-
Reduce sugar by 1–2 tbsp
-
Use low-fat cream cheese (texture will be softer)
-
Top with fresh fruit instead of frosting or whipped cream
FAQs
Q1: Why did my cheesecake deflate?
A1: Some deflation is normal, but drastic sinking can result from overbeaten meringue, sudden temperature changes, or underbaking. Cool the cake gradually and avoid opening the oven too early.
Q2: Can I make this cake ahead of time?
A2: Yes! Japanese cheesecake tastes best after chilling for a few hours. You can make it a day in advance and store it covered in the fridge.
Q3: Do I have to use a water bath?
A3: Yes, for the best texture. A water bath keeps the temperature even and adds moisture, which prevents cracking and dryness.
Q4: Can I freeze Japanese cheesecake?
A4: You can, but the texture may change slightly. Wrap slices tightly and freeze for up to 1 month. Thaw in the fridge before serving.
Q5: What’s the difference between Japanese and New York cheesecake?
A5: Japanese cheesecake is light, airy, and spongy — more like a chiffon cake. New York cheesecake is dense, rich, and baked with a graham crust.
Q6: Why is my cheesecake lumpy?
A6: Your cream cheese may have been too cold or not fully blended. Warm it gently and whisk until smooth before adding other ingredients.
Q7: Can I use a springform pan?
A7: It’s not recommended unless you wrap it very well in foil, as springforms can leak in a water bath. A solid cake pan works better.
PrintFluffy Japanese Cheesecake Recipe – Soft, Airy & Delicious
A soft and fluffy Japanese cheesecake with a rich cream cheese base and cloud-like texture — a perfect blend of cheesecake and sponge cake.
- Prep Time: 25 minutes
- Cook Time: 1 hour 10 minutes
- Total Time: 1 hour 35 minutes
- Yield: 8 servings 1x
Ingredients
-
7 oz (200g) cream cheese
-
¼ cup (60g) unsalted butter
-
⅓ cup (80ml) whole milk
-
4 large eggs, separated
-
½ cup (60g) cake flour
-
2 tbsp (15g) cornstarch
-
½ cup (100g) granulated sugar (for meringue)
-
3 tbsp (40g) granulated sugar (for yolk mixture)
-
½ tsp cream of tartar or 1 tsp lemon juice
-
1 tsp vanilla extract (optional)
-
Pinch of salt
Instructions
-
Preheat oven to 320°F. Grease and line an 8-inch round cake pan. Wrap the outside in foil.
-
Melt cream cheese, butter, and milk over double boiler. Cool slightly.
-
Whisk in egg yolks and vanilla. Sift in flour, cornstarch, and salt. Mix until smooth.
-
In another bowl, beat egg whites and cream of tartar to soft peaks. Gradually add sugar and beat to glossy medium peaks.
-
Gently fold meringue into batter in three additions.
-
Pour into pan, tap to release air bubbles.
-
Bake in a water bath at 320°F for 20 minutes, then lower to 285°F for 40–50 minutes.
-
Let cool in oven with door cracked, then refrigerate 1–2 hours before slicing.
Notes
-
Chill before serving for best texture.
-
Dust with powdered sugar or top with fruit.
-
Store in fridge for up to 4 days.