
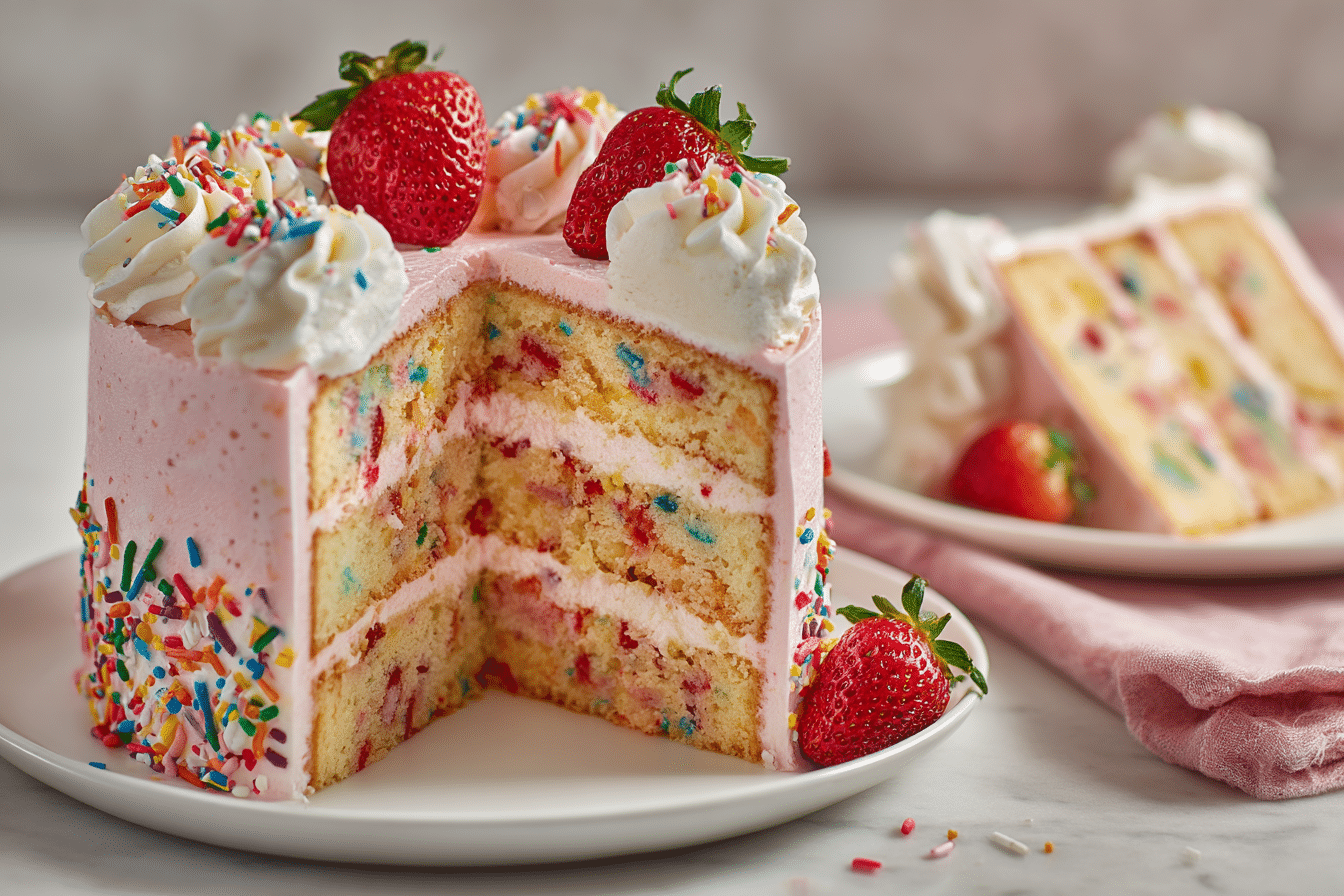
Few cakes bring out sheer joy like a classic Funfetti Layer Cake. With its fluffy vanilla layers speckled with bright rainbow sprinkles and smothered in creamy buttercream frosting, this cake is a nostalgic nod to childhood birthdays and celebrations.
Funfetti cake originated as a boxed cake mix in the late 1980s, but its homemade version has become a modern-day baking staple. It’s soft, buttery, and slightly dense, with the colorful pops of sprinkles that create a festive visual in every slice.
Whether you’re baking for a birthday, a baby shower, or just because — this cake is guaranteed to delight both kids and adults. The layers are moist and tender, the frosting is rich but not too sweet, and the sprinkles? They turn it into a celebration on a plate.
Ingredients Overview
Creating the perfect Funfetti Layer Cake starts with understanding each ingredient’s role in achieving that signature texture and flavor.
-
All-Purpose Flour: This forms the base of the cake, providing structure. Be sure to measure it properly using the spoon-and-level method to avoid a dense crumb.
-
Baking Powder & Baking Soda: These leavening agents help the cake rise and give it a light, fluffy texture. A combination of both ensures even lift and a tender bite.
-
Unsalted Butter: Creamed with sugar, butter gives the cake its rich, classic taste. Using room-temperature butter is key to achieving the right texture.
-
Granulated Sugar: Sweetens the cake and helps with structure when creamed with butter.
-
Egg Whites: Using just the whites keeps the cake light in color and texture, while still binding the ingredients.
-
Whole Milk or Buttermilk: Buttermilk adds a slight tang and keeps the crumb tender. Milk works just as well if that’s what you have on hand.
-
Vanilla Extract: Essential for the cake’s signature flavor. Use pure vanilla for the best result.
-
Rainbow Sprinkles (Jimmies): These don’t just add color—they also provide slight texture and a bit of fun. Avoid nonpareils, which tend to bleed color.
-
Buttercream Frosting: Typically made with butter, powdered sugar, vanilla, and a bit of cream or milk, it’s smooth, pipeable, and easy to tint if desired.
Substitutions & Variations:
-
Use gluten-free 1:1 flour blend for a gluten-free version.
-
Substitute dairy milk with almond or oat milk and use dairy-free butter for a vegan-friendly option (with egg replacers).
-
For a chocolate twist, fold mini white chocolate chips into the batter along with the sprinkles.
Step-by-Step Instructions
1. Prepare the Pans and Preheat the Oven
Start by preheating your oven to 350°F (175°C). Grease and line three 8-inch round cake pans with parchment paper. This ensures easy removal and clean layers.
2. Mix the Dry Ingredients
In a medium bowl, whisk together flour, baking powder, baking soda, and salt. Set aside. This step evenly distributes the leaveners throughout the flour.
3. Cream Butter and Sugar
In a stand mixer or large mixing bowl, beat the butter and sugar on medium-high for about 3–4 minutes, until the mixture is pale and fluffy. This step is essential—it incorporates air into the batter for a light cake.
4. Add Egg Whites and Vanilla
With the mixer on low, slowly add the egg whites, one at a time, mixing well after each. Scrape down the sides and then add the vanilla extract.
5. Alternate Dry Ingredients and Milk
Add the flour mixture in three additions, alternating with the milk (or buttermilk). Begin and end with the dry ingredients. Mix just until combined to avoid overmixing.
6. Fold in Sprinkles
Using a spatula, gently fold in the sprinkles. Do this at the end so they don’t bleed color or break apart.
7. Bake the Layers
Divide the batter evenly between the prepared pans. Smooth the tops and bake for 25–28 minutes, or until a toothpick inserted in the center comes out clean. Allow cakes to cool in the pans for 10 minutes, then transfer to a wire rack to cool completely.
8. Make the Buttercream
Beat room-temperature butter until creamy, then gradually add sifted powdered sugar. Add vanilla and a splash of milk or cream to reach a smooth, spreadable consistency.
9. Assemble the Cake
Place one cake layer on a serving plate. Spread a generous amount of buttercream on top. Repeat with the second and third layers. Apply a thin crumb coat, chill for 20 minutes, then finish with a final coat of frosting.
10. Decorate
Top the cake with extra sprinkles around the sides, edges, or even a colorful drip if desired. You can also pipe rosettes or swirls for a bakery-style finish.
Tips, Variations & Substitutions
-
Preventing Dense Cake: Don’t overmix once the flour is added. Overmixing can lead to a tough texture.
-
Avoid Bleeding Sprinkles: Use long sprinkles (jimmies) rather than round nonpareils. Gently fold them into the batter just before baking.
-
Flavor Twists:
-
Add almond extract for a classic bakery-style flavor.
-
Replace vanilla with lemon or orange extract for a citrusy version.
-
-
Frosting Ideas:
-
Cream cheese buttercream for tang.
-
Swiss meringue buttercream for a lighter, silky finish.
-
-
Dietary Adjustments:
-
Use dairy-free butter and plant milk for a lactose-free cake.
-
Replace eggs with aquafaba or flax eggs for vegan adaptation.
-
Serving Ideas & Occasions
This Funfetti Layer Cake is tailor-made for birthdays, baby showers, and festive gatherings. Its cheerful appearance instantly brightens up any dessert table.
Serve it with:
-
A scoop of vanilla bean ice cream.
-
Fresh berries for contrast.
-
A glass of cold milk or a warm latte.
Perfect for:
-
Kids’ birthday parties
-
Office celebrations
-
Bridal showers
-
Just-for-fun weekend baking
It’s the kind of cake that turns an ordinary day into a special one.
Nutritional & Health Notes
A slice of Funfetti Layer Cake typically contains a mix of carbs, fats, and sugars—expected for a celebratory dessert.
-
Protein: From egg whites and milk.
-
Fats: Mostly from butter; use less in the frosting for a lighter version.
-
Carbohydrates: Primarily from sugar and flour—portion control helps balance this.
-
Calories: Ranges between 400–550 per slice depending on frosting thickness.
For cleaner eating, consider:
-
Reducing sugar by ¼ cup without compromising texture.
-
Using natural food dyes in sprinkles and frosting.
-
Swapping half of the flour with whole wheat pastry flour for a fiber boost.
FAQs
Q1: Can I make this cake ahead of time?
Yes! You can bake the cake layers up to 2 days in advance. Wrap them tightly in plastic wrap and store at room temperature or refrigerate. The frosting can also be made 3 days ahead and kept in the fridge. Bring to room temperature and re-whip before using.
Q2: Can I use cake flour instead of all-purpose flour?
Absolutely. Cake flour will make the crumb even lighter and more tender. Use 1 cup + 2 tablespoons of cake flour for every cup of all-purpose flour in the recipe.
Q3: How do I stop the sprinkles from sinking to the bottom?
Be sure your batter isn’t too thin, and fold the sprinkles in gently at the end. If you’re still seeing sinking, you can lightly toss them in a teaspoon of flour before adding them in.
Q4: What’s the best way to store leftover cake?
Store leftovers in an airtight container at room temperature for up to 2 days or in the refrigerator for up to 5 days. If chilled, let the cake sit at room temperature for 20–30 minutes before serving.
Q5: Can I freeze Funfetti cake?
Yes, both the frosted and unfrosted layers freeze well. Wrap tightly in plastic wrap and foil, then freeze for up to 2 months. Thaw overnight in the fridge before serving.
Q6: What kind of sprinkles should I use?
Use “jimmies” — the long, rod-like sprinkles. They hold their color and texture during baking. Avoid nonpareils, which tend to bleed and melt into the batter.
Q7: Can I bake this in a 9×13-inch pan instead?
Definitely. The batter fits well in a 9×13-inch pan. Bake at 350°F for about 35–40 minutes, or until a toothpick comes out clean. This is a great option for a sheet cake-style party dessert.
PrintCream Cheese Frosted Funfetti Cake – Simple Layer Cake Recipe
A cheerful and moist Funfetti Layer Cake filled with colorful sprinkles and frosted with creamy vanilla buttercream — perfect for birthdays, parties, or any celebration.
- Prep Time: 25 minutes
- Cook Time: 28 minutes
- Total Time: 1 hour
- Yield: 12 servings 1x
Ingredients
-
-
2 ½ cups all-purpose flour
-
2 ½ tsp baking powder
-
½ tsp baking soda
-
½ tsp salt
-
¾ cup unsalted butter, room temperature
-
1 ¾ cups granulated sugar
-
4 large egg whites, room temperature
-
1 tbsp vanilla extract
-
1 cup buttermilk (or whole milk)
-
½ cup rainbow sprinkles (jimmies)
Buttercream Frosting:
-
1 cup unsalted butter, room temperature
-
3 ½–4 cups powdered sugar, sifted
-
2–3 tbsp milk or cream
-
1 tbsp vanilla extract
-
Pinch of salt
.
-
Instructions
-
-
Preheat oven to 350°F (175°C). Grease and line three 8-inch round pans.
-
In a bowl, whisk flour, baking powder, baking soda, and salt.
-
Cream butter and sugar until light and fluffy (3–4 mins).
-
Beat in egg whites one at a time. Add vanilla.
-
Alternate adding dry ingredients and milk, starting and ending with flour.
-
Fold in sprinkles gently.
-
Divide batter evenly into pans. Bake 25–28 mins or until a toothpick comes out clean.
-
Cool in pans for 10 mins, then transfer to racks to cool completely.
-
For frosting: beat butter until creamy. Add sugar, vanilla, salt, and milk until smooth and fluffy.
-
Assemble and frost the cake. Decorate with extra sprinkles as desired.
-
-
Pinch of salt
Notes
Use cake flour for a softer crumb. To make ahead, wrap cooled layers and freeze for up to 2 months. Substitute non-dairy milk and butter for a vegan version.