
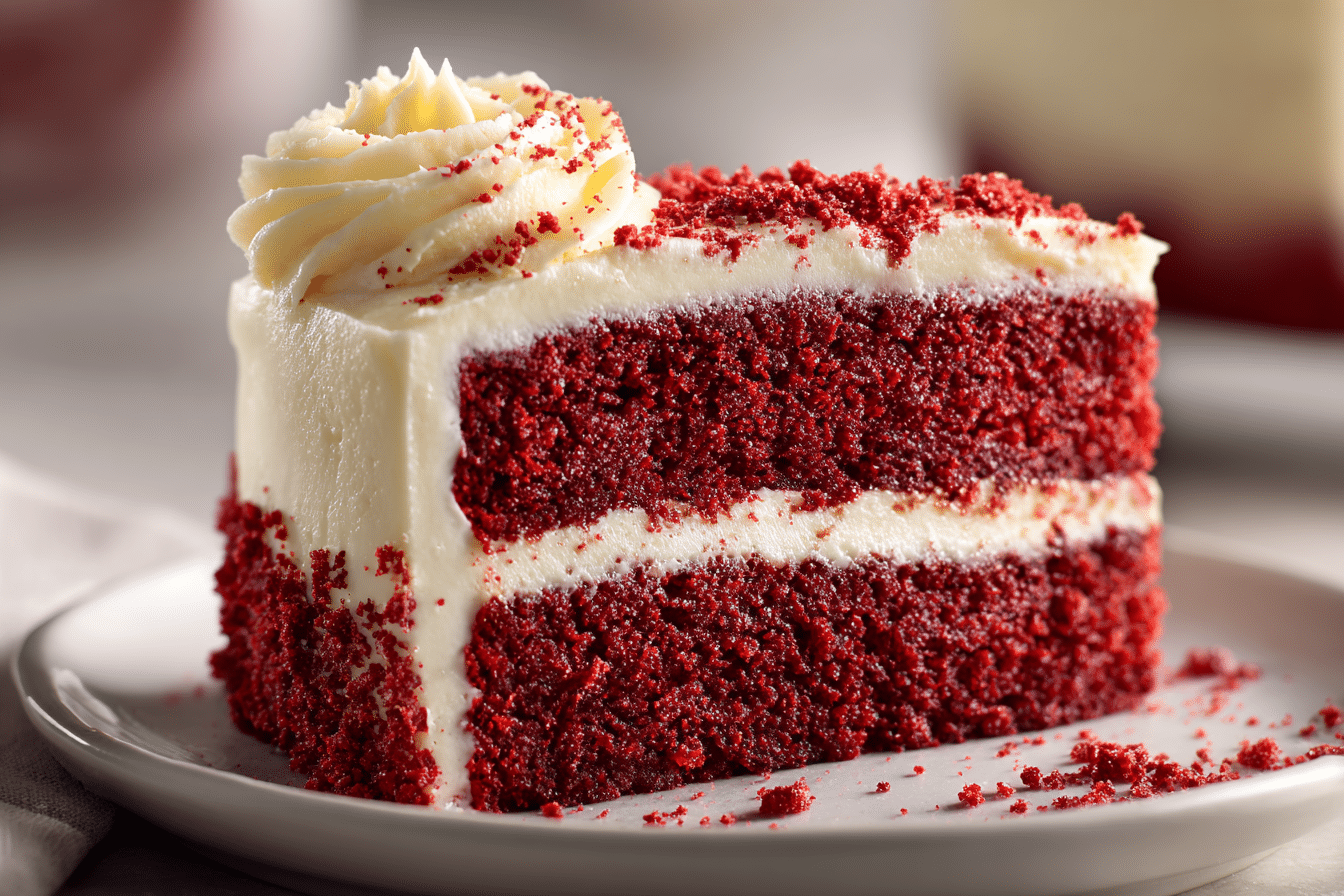
This easy classic red velvet cake is the perfect balance of rich cocoa flavor, subtle tang, and ultra-soft texture — all topped with a smooth and luscious cream cheese frosting. Inspired by the traditional Southern favorite and adapted into a streamlined recipe by Bake with Zoha, this version stays true to the cake’s roots while making it accessible for home bakers.
With its deep red hue and velvety crumb, red velvet cake is as much about texture as taste. A hint of cocoa, buttermilk, and vinegar work together to create its signature flavor and tender bite. Whether you’re baking it for a birthday, Valentine’s Day, or a casual weekend treat, this easy recipe delivers impressive results every time.
Ingredients Overview
All-Purpose Flour
Provides structure while keeping the crumb tender. Be sure to spoon and level for accurate measurement.
Unsweetened Cocoa Powder
Adds depth without making it a chocolate cake. Use natural cocoa powder — not Dutch-processed — to interact with the vinegar and baking soda for lift and flavor.
Baking Soda
Works with vinegar and buttermilk to create a light, fluffy texture. Make sure it’s fresh for the best rise.
Salt
Balances the sweetness and enhances all the flavors.
Granulated Sugar
Sweetens the cake while also helping it stay moist and tender.
Eggs
Bind the batter and contribute to structure and richness. Use room temperature eggs for smoother blending.
Vegetable Oil
Creates a moist, tender crumb that stays soft for days. Unlike butter, it adds richness without making the cake dense.
Buttermilk
The acidity in buttermilk tenderizes the crumb and balances the cocoa and sugar. It’s a must for authentic flavor.
-
Substitute: Mix 1 cup milk + 1 tbsp vinegar or lemon juice. Let sit 5 minutes.
White Vinegar
Reacts with the baking soda and cocoa powder to enhance texture and color. A classic ingredient in red velvet cake.
Vanilla Extract
Adds warmth and rounds out the flavor profile.
Red Food Coloring
Gives the cake its signature vibrant red hue. Use liquid or gel depending on the depth of color desired.
-
Optional: Omit for a more natural look; the cake will be a light cocoa color.
Cream Cheese Frosting (for topping)
Rich, tangy, and slightly sweet — the classic pairing for red velvet cake.
-
Made with cream cheese, butter, powdered sugar, and vanilla.
Step-by-Step Instructions
1. Preheat and Prep
Preheat oven to 350°F (175°C). Grease and line two 8-inch round cake pans with parchment paper.
2. Mix Dry Ingredients
In a medium bowl, whisk together:
-
2 ½ cups all-purpose flour
-
2 tbsp unsweetened natural cocoa powder
-
1 tsp baking soda
-
½ tsp salt
Set aside.
3. Whisk Wet Ingredients
In a large mixing bowl, combine:
-
1 ½ cups granulated sugar
-
2 large eggs
-
1 cup vegetable oil
-
1 cup buttermilk
-
1 tbsp white vinegar
-
2 tsp vanilla extract
-
1–2 tbsp red food coloring (adjust to preference)
Whisk until smooth and well combined.
4. Combine Wet and Dry
Gradually add the dry ingredients to the wet mixture in batches, whisking or folding just until no streaks of flour remain.
-
Tip: Do not overmix — it can make the cake tough.
5. Bake
Divide the batter evenly between the prepared pans. Tap pans lightly on the counter to release air bubbles.
Bake for 28–32 minutes, or until a toothpick inserted into the center comes out clean.
Let cakes cool in the pans for 10 minutes, then turn out onto wire racks to cool completely.
6. Make Cream Cheese Frosting
In a bowl, beat:
-
8 oz (226g) cream cheese, softened
-
½ cup (1 stick) unsalted butter, softened
-
3–4 cups powdered sugar
-
1 tsp vanilla extract
Beat until light and fluffy, about 2–3 minutes. Adjust sugar to taste and consistency.
7. Assemble
Place one cake layer on a serving plate. Spread a generous layer of frosting on top. Add the second cake layer and frost the top and sides.
For a classic look, use a crumb coat and chill before applying a final layer of frosting.
Tips, Variations & Substitutions
-
Cupcakes: Divide batter into cupcake liners and bake for 18–20 minutes.
-
Natural Color: Skip food dye and enjoy a “naked” cocoa-colored red velvet.
-
Gluten-Free: Use a 1:1 gluten-free flour blend with xanthan gum.
-
Extra Moisture: Add 2 tbsp sour cream or Greek yogurt to the wet ingredients.
-
Layer Boost: Add raspberry or strawberry jam between layers for fruity contrast.
Serving Ideas & Occasions
Red velvet cake is a showstopper for nearly any celebration:
-
Weddings, birthdays, or anniversaries
-
Valentine’s Day or romantic dinners
-
Holiday spreads for something unique yet familiar
-
Served with berries or chocolate curls for added elegance
-
Pairs beautifully with coffee, tea, or sparkling wine
Slice with a warm knife for clean cuts and show off the beautiful red crumb against the cream cheese layers.
Nutritional & Health Notes
Red velvet cake is an indulgent dessert best enjoyed in moderate portions:
-
Calories: ~400–450 per frosted slice (based on 12 slices)
-
Fat & Sugar: High, due to oil, sugar, and cream cheese
-
Dairy-Free Option: Use plant-based buttermilk and vegan frosting
-
Make Ahead: Cake layers can be baked and frozen up to 1 month in advance
Use full-fat ingredients for best flavor and texture — this cake is meant to be rich and satisfying.
FAQs
Q1: Why is vinegar used in red velvet cake?
A1: Vinegar reacts with baking soda and cocoa powder to help the cake rise and create its velvety texture. It also enhances the red color of the batter when food coloring is added.
Q2: Can I use Dutch-processed cocoa?
A2: It’s not recommended for this recipe. Dutch cocoa is less acidic and won’t react properly with the baking soda and vinegar. Use natural unsweetened cocoa for authentic flavor and lift.
Q3: Can I make this cake without food coloring?
A3: Yes. The cake will have a soft brown hue from the cocoa powder, but the flavor and texture will remain the same. It’s just as delicious without the red tint.
Q4: How do I store red velvet cake?
A4: Store frosted cake in the refrigerator, covered, for up to 5 days. Bring to room temperature before serving. You can also freeze unfrosted layers for up to 1 month.
Q5: Can I make this into a sheet cake?
A5: Yes. Pour the batter into a greased 9×13-inch pan and bake for 35–38 minutes, or until a toothpick comes out clean. Cool and frost as desired.
Q6: Why is my cake dry?
A6: Overbaking or overmixing can lead to a dry cake. Be sure to check doneness early and mix the batter only until just combined.
Q7: Can I use butter instead of oil?
A7: Oil gives the cake its signature moist texture. You can use melted butter, but the crumb will be slightly denser and less tender.
PrintMoist Homemade Red Velvet Cake
This easy classic red velvet cake is soft, moist, and full of rich cocoa and vanilla flavor, finished with a tangy cream cheese frosting. Perfect for any celebration.
- Prep Time: 25 minutes
- Cook Time: 30 minutes
- Total Time: 1 hour
- Yield: 12 slices 1x
Ingredients
For the cake:
-
2 ½ cups all-purpose flour
-
2 tbsp natural cocoa powder
-
1 tsp baking soda
-
½ tsp salt
-
1 ½ cups granulated sugar
-
2 large eggs
-
1 cup vegetable oil
-
1 cup buttermilk
-
1 tbsp white vinegar
-
2 tsp vanilla extract
-
1–2 tbsp red food coloring
For the frosting:
-
8 oz cream cheese, softened
-
½ cup unsalted butter, softened
-
3–4 cups powdered sugar
-
1 tsp vanilla extract
Instructions
-
Preheat oven to 350°F. Grease and line two 8-inch pans.
-
Whisk flour, cocoa, baking soda, and salt.
-
In another bowl, mix sugar, eggs, oil, buttermilk, vinegar, vanilla, and food coloring.
-
Add dry ingredients to wet in batches, mixing just until combined.
-
Divide into pans and bake 28–32 minutes.
-
Cool completely before frosting.
-
For frosting, beat cream cheese and butter until smooth. Add powdered sugar and vanilla. Beat until fluffy.
-
Assemble and frost cooled cakes
Notes
-
Use natural cocoa powder.
-
Chill cake before slicing for neater presentation.
-
Store covered in fridge for up to 5 days.