
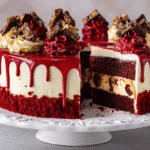
Red Velvet Cheesecake Layer Cake is the ultimate marriage of two decadent classics: moist red velvet cake and creamy New York-style cheesecake. With its striking red-and-white contrast and luscious texture, this cake is as dramatic in appearance as it is rich in flavor.
This dessert became popular through high-end bakeries and Pinterest-worthy celebrations, often served at weddings, Valentine’s Day, or any time a luxurious treat is in order. The vibrant red velvet layers bring cocoa-kissed sweetness, while the creamy cheesecake center adds tang and silkiness. Finished with a cloud of cream cheese frosting, every bite is smooth, slightly tangy, and perfectly sweet.
This cake isn’t just a dessert — it’s an experience.
Ingredients Overview
Let’s break down the components that bring this layered beauty to life. Each element plays a crucial role in flavor, structure, and presentation.
For the Cheesecake Layer
-
Cream cheese (full-fat): The foundation of any great cheesecake — rich, smooth, and tangy. Make sure it’s at room temperature for a silky filling.
-
Granulated sugar: Sweetens the cheesecake without overpowering the tang.
-
Eggs: Bind the filling and provide structure.
-
Sour cream: Adds moisture and subtle acidity to balance richness.
-
Vanilla extract: Adds sweet depth and enhances overall flavor.
-
All-purpose flour: Helps stabilize the cheesecake and makes slicing cleaner.
Tip: Make the cheesecake layer a day ahead and freeze it to make assembling the cake easier.
For the Red Velvet Cake
-
All-purpose flour: Provides the structure of the cake. Sift it for a tender crumb.
-
Cocoa powder: Just a touch gives red velvet its subtle chocolate flavor.
-
Buttermilk: Essential for that signature tang and tender texture.
-
Vegetable oil: Keeps the cake ultra-moist.
-
Eggs: Add structure and richness.
-
White vinegar: Reacts with baking soda to give the cake lift — and is traditional in red velvet recipes.
-
Baking soda: Works with the vinegar for a light crumb.
-
Vanilla extract: Rounds out the flavor.
-
Red food coloring: Gives the cake its vibrant color. Gel food coloring gives a deeper hue with less liquid.
Dye-Free Option: Use beetroot powder for a natural red tone.
For the Cream Cheese Frosting
-
Cream cheese: Must be softened for smooth mixing.
-
Unsalted butter: Adds structure and richness.
-
Powdered sugar: Sweetens and helps the frosting hold its shape.
-
Vanilla extract: Adds flavor depth.
-
Heavy cream (optional): For extra fluffiness, whip in a bit at the end.
Dairy-Free Option: Use dairy-free cream cheese and plant-based butter substitutes.
Step-by-Step Instructions

This cake is a labor of love, but each step is straightforward — and the result is bakery-worthy.
1. Make the Cheesecake Layer
Preheat your oven to 325°F (163°C). Line the bottom of a 9-inch springform pan with parchment paper. Lightly grease the sides.
In a large bowl, beat softened cream cheese until smooth and creamy. Add sugar and beat until light and fluffy. Mix in eggs one at a time, scraping the bowl in between. Blend in sour cream, vanilla, and flour.
Pour into the prepared pan. Bake for 50–60 minutes, until the center is slightly jiggly but edges are set. Turn off the oven and let the cheesecake cool inside for 1 hour. Then chill in the refrigerator for at least 4 hours, or overnight.
Once fully chilled, freeze for 1–2 hours before assembling the cake to make layering easier.
2. Bake the Red Velvet Cake Layers
Preheat oven to 350°F (177°C). Grease and flour two 9-inch round cake pans. Line bottoms with parchment paper.
In a bowl, sift together flour, cocoa powder, baking soda, and salt.
In a separate large bowl, beat oil and sugar together until combined. Add eggs one at a time, then mix in buttermilk, vanilla, vinegar, and red food coloring.
Add dry ingredients in two additions, mixing until just combined. Don’t overmix — this keeps the cake tender.
Divide the batter evenly between the prepared pans. Bake for 25–30 minutes or until a toothpick comes out clean. Cool completely in pans before removing.
3. Make the Cream Cheese Frosting
In a stand mixer or large bowl, beat cream cheese and butter until smooth and fluffy. Gradually add powdered sugar and beat until creamy and thick.
Add vanilla extract. If needed, beat in a tablespoon of heavy cream for a lighter texture.
Chill for 20–30 minutes before using for easier spreading.
4. Assemble the Cake
Place one red velvet cake layer on a serving plate or cake stand. Spread a thin layer of frosting on top.
Gently place the frozen cheesecake layer on top. Peel off parchment if needed. Add another thin layer of frosting.
Top with the second red velvet cake layer.
Frost the entire cake with a crumb coat — a thin layer to seal in crumbs. Chill for 30 minutes, then finish with a thick, even layer of cream cheese frosting.
Decorate with red velvet cake crumbs, piped swirls, or shaved white chocolate.
Tips, Variations & Substitutions
Expert Tips
-
Use a cake leveler or serrated knife to trim domed tops for flat layers.
-
Chill all layers before assembling to make stacking easier.
-
Use a rotating cake stand and offset spatula for professional-looking frosting.
Variations
-
Chocolate Cheesecake Layer: Add melted semi-sweet chocolate to the cheesecake batter for a deeper contrast.
-
Mini Cakes: Use a 6-inch pan and make two smaller cakes instead.
-
Cupcake Version: Bake the red velvet as cupcakes and top with scoops of no-bake cheesecake filling.
Dietary Substitutions
-
Gluten-Free: Use a 1:1 gluten-free flour blend in both cake and cheesecake layers.
-
Vegan: Substitute dairy-free cream cheese, butter, and buttermilk, and use flax eggs for binding.
Serving Ideas & Occasions
This Red Velvet Cheesecake Layer Cake is made for celebration. Serve it chilled or at room temperature with:
-
Hot coffee or espresso
-
A glass of cold milk
-
Berries or raspberry coulis for tart contrast
-
Chocolate drizzle or ganache for extra indulgence
Ideal Occasions:
-
Valentine’s Day or romantic anniversaries
-
Birthdays or milestone events
-
Holiday dessert buffets
-
Weddings, showers, or graduations
Its dramatic layers and deep red color make it a centerpiece dessert — guaranteed to impress.
Nutritional & Health Notes
This cake is unapologetically rich. With its layers of cream cheese, butter, and sugar, it’s best enjoyed in modest slices.
Each serving delivers:
-
Protein and calcium from cream cheese and eggs
-
A combination of carbohydrates and fats that make it deeply satisfying
-
Antioxidants in cocoa powder and natural food dyes (if beetroot is used)
To lighten it up:
-
Use reduced-fat dairy options
-
Make a half-size version or bake into mini rounds
-
Cut into smaller portions and pair with fruit
Freezes well — slice and wrap for single servings that last up to two months.
FAQs
Q1: Can I make this cake ahead of time?
A1: Absolutely. Make each layer a day ahead, wrap tightly, and refrigerate. Assemble the day of serving for freshest texture.
Q2: Do I have to freeze the cheesecake layer?
A2: Freezing it for a short time makes it much easier to stack and frost. It also helps maintain shape during assembly.
Q3: Can I use store-bought red velvet cake mix?
A3: Yes — while homemade offers superior flavor and texture, a boxed mix can save time. Just make sure the cake layers are fully cooled before assembling.
Q4: What’s the best way to transport this cake?
A4: Chill it completely, then store in a tall cake carrier. You can also freeze for a short time before traveling to help it stay firm.
Q5: Can I use natural food coloring?
A5: Yes, beetroot powder or natural red dyes work, but expect a more muted red hue. The flavor may be slightly earthier as well.
Q6: How do I store leftovers?
A6: Cover and refrigerate for up to 5 days. For longer storage, slice and freeze pieces in an airtight container.
Q7: Can I turn this into cupcakes?
A7: Yes! Bake red velvet cupcakes, top with a scoop of no-bake cheesecake filling, and frost as usual. It’s a fun, individual version of the original.
PrintRed Velvet Cheesecake Layer Cake for Special Occasions
A rich and festive dessert made with two layers of moist red velvet cake, a creamy cheesecake center, and fluffy cream cheese frosting. Perfect for special occasions and celebrations.
- Prep Time: 40 minutes
- Cook Time: 1 hour 30 minutes
- Total Time: 7–8 hours (with chilling)
- Yield: 12–14 servings 1x
Ingredients
For the Cheesecake Layer:
-
2 (8 oz) blocks cream cheese, softened
-
½ cup granulated sugar
-
2 large eggs
-
½ cup sour cream
-
1 tsp vanilla extract
-
2 tbsp all-purpose flour
For the Red Velvet Cake:
-
2 ½ cups all-purpose flour
-
2 tbsp cocoa powder
-
1 tsp baking soda
-
½ tsp salt
-
1 ½ cups granulated sugar
-
1 cup vegetable oil
-
2 large eggs
-
1 cup buttermilk
-
1 tbsp red food coloring
-
1 tsp vanilla extract
-
1 tsp white vinegar
For the Frosting:
-
1 (8 oz) block cream cheese, softened
-
½ cup unsalted butter, softened
-
3 ½ cups powdered sugar
-
1 tsp vanilla extract
-
1–2 tbsp heavy cream (optional)
Instructions
-
Preheat oven to 325°F. Make cheesecake: beat cream cheese and sugar, then mix in eggs, sour cream, vanilla, and flour. Pour into greased 9″ springform pan and bake 50–60 minutes. Cool, then chill overnight or freeze for 1–2 hours before use.
-
Make red velvet cake: preheat oven to 350°F. Mix dry ingredients. In a separate bowl, beat oil and sugar, then add eggs, buttermilk, vanilla, vinegar, and food coloring. Combine with dry mix. Bake in two 9″ pans for 25–30 minutes. Cool completely.
-
Make frosting: beat cream cheese and butter, then add powdered sugar and vanilla. Beat until fluffy, adding cream if needed.
-
Assemble: place one cake layer, frost lightly, add cheesecake, then second cake. Apply crumb coat, chill, then frost fully. Decorate as desired.
Notes
-
Make cheesecake a day ahead for easy layering.
-
Substitute beet powder for natural coloring.
-
Freeze slices for longer storage.