
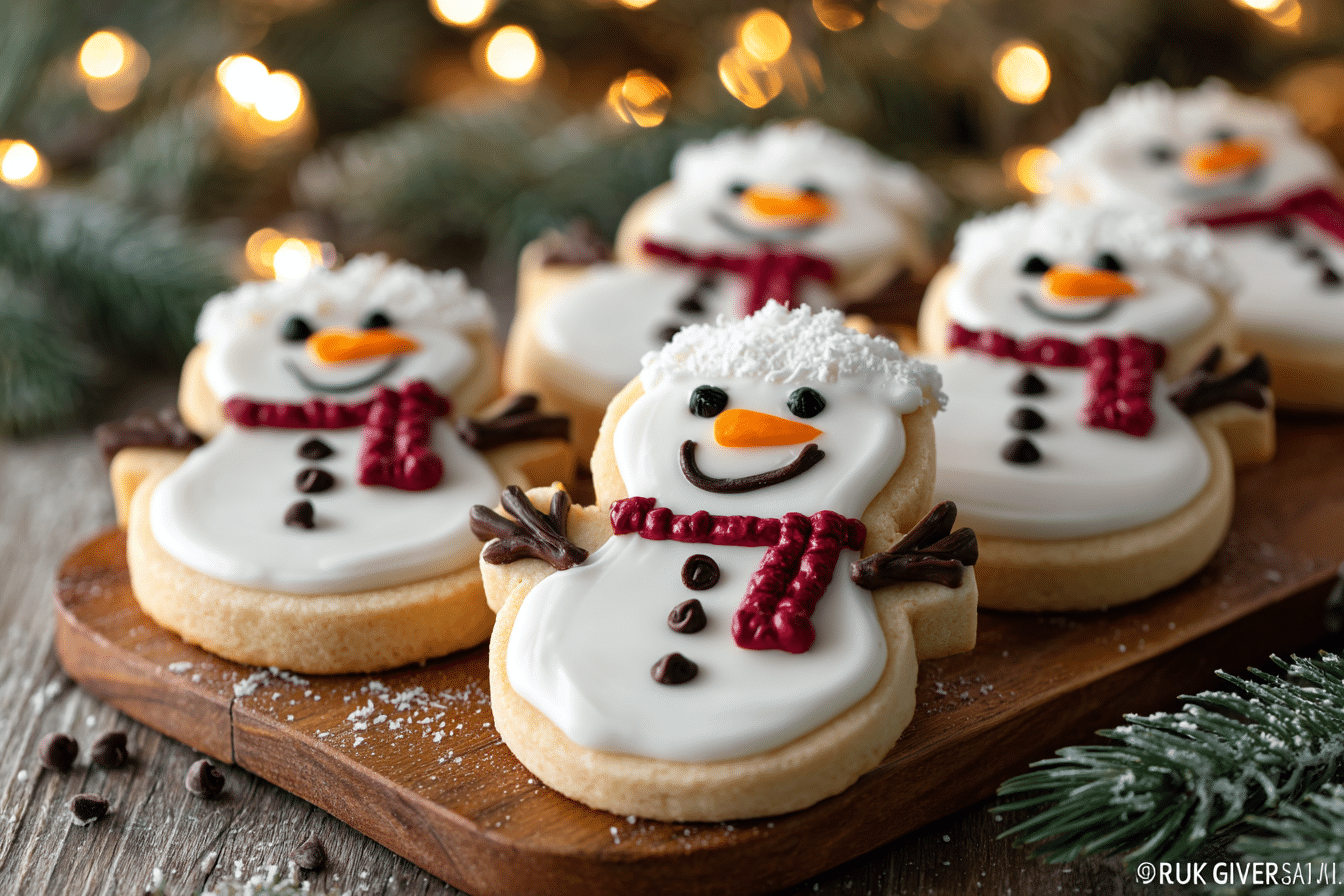
Melting Snowman Cookies are whimsical, frosted sugar cookies decorated to look like snowmen in the midst of a meltdown. With gooey white icing puddling around a marshmallow “head,” these treats are as charming as they are delicious.
Originally made popular on holiday baking blogs and Pinterest boards, these cookies are now a festive favorite for Christmas parties, winter birthdays, and cookie exchanges. They’re incredibly fun to make — especially with kids — and bring a touch of humor to your holiday dessert spread.
Soft sugar cookies provide the perfect base for a marshmallow-topped snowman slowly “melting” under a swirl of icing. Whether you’re a beginner baker or crafting a seasonal showstopper, these cookies are guaranteed to spark smiles and festive cheer.
Ingredients Overview
Here’s a breakdown of the key components that bring these cookies to life, along with helpful notes and variations.
-
Sugar Cookie Base
A soft sugar cookie is ideal — sturdy enough to hold icing but tender inside. You can use homemade dough or a store-bought roll for convenience. If using homemade, choose a recipe that doesn’t overly spread while baking. -
Royal Icing or Glaze
For the melting snow effect, use a pourable white icing. Royal icing offers a smooth, opaque finish that sets well. A simple powdered sugar glaze (with milk and vanilla) also works if you’re short on time. -
Large Marshmallows
These form the snowman’s “head.” Fresh, fluffy marshmallows stick easily and create height. Slightly softening them in the microwave for 5 seconds gives a “slumped” effect that enhances the melted look. -
Edible Decorations
Use mini chocolate chips, colored icing, or candy melts for the face and buttons. Tiny pretzel sticks or licorice make great arms, while orange sprinkle rods or fondant create cute carrot noses. -
Gel Food Coloring or Writing Pens
Black, orange, and red edible food markers or colored icing tubes help decorate with detail. These tools are especially handy for faces and scarf designs.
Optional Ingredients:
-
Vanilla or almond extract in the icing for flavor.
-
Sprinkles or sanding sugar for extra sparkle.
-
Add cocoa powder to icing or dough for chocolate versions.
Dietary Swaps:
-
Use a gluten-free flour blend for the sugar cookie base.
-
Vegan marshmallows and plant-based butter can be used to make dairy-free or egg-free versions.
-
Substitute natural food dyes for artificial colors.
Step-by-Step Instructions
These cookies are all about fun and decoration. Here’s how to get them just right:
1. Make the Sugar Cookies
Prepare your sugar cookie dough and roll into 2-inch balls. Flatten slightly on a baking sheet lined with parchment paper.
Bake at 350°F (175°C) for 8–10 minutes until the edges are set but not browned. Let them cool completely before decorating.
2. Prepare the Icing
For royal icing, mix powdered sugar with a small amount of egg white or meringue powder and water. Beat until smooth but still pourable. For glaze, combine powdered sugar with milk and a splash of vanilla extract until it reaches a thick, spreadable consistency.
Divide a portion if you’ll be coloring it for scarf or button details.
3. Create the Melting Effect
Spoon or pipe white icing on top of each cooled cookie, letting it drip unevenly around the edges to mimic a melted puddle.
Before the icing sets, press a marshmallow near the top edge to form the snowman’s head.
4. Decorate the Faces
Use food pens, icing, or melted chocolate to draw eyes, a mouth, and buttons. Add a small orange nose (fondant, sprinkle, or icing) and draw twig arms extending into the icing puddle.
For an extra whimsical touch, tilt the marshmallow or slightly melt it in the microwave to give the snowman a “slumping” look.
5. Add Scarves and Hats
Use red or green icing to draw scarves around the marshmallow base. You can also use fruit leather strips, licorice laces, or candy belts. Tiny hats can be made from chocolate coins and candy disks if desired.
Let all decorations set at room temperature for 1–2 hours before stacking or storing.
Tips, Variations & Substitutions
Decorating Tips:
-
Work one cookie at a time so the icing doesn’t set before you attach the marshmallow and decorations.
-
Use toothpicks or skewers for precision when adding small icing details.
-
Keep a damp cloth over icing bags if decorating over time to prevent hardening.
Creative Variations:
-
Chocolate Snowmen: Use cocoa powder in the dough and icing for a “muddy snowman” look.
-
Peppermint Twist: Add peppermint extract to the icing and sprinkle crushed candy canes on top.
-
Mini Versions: Make bite-size cookies with mini marshmallows for a party platter.
Substitutions:
-
Allergy-friendly: Use nut-free and dye-free candies if serving at schools or events.
-
No icing pens? Use melted white, dark, or colored chocolate in piping bags or zip-top bags with a snipped corner.
Serving Ideas & Occasions
These cookies are made for winter fun and are especially popular at:
-
Holiday parties, cookie exchanges, or bake sales
-
Classroom crafts or kid-friendly baking sessions
-
Snow days at home, served with hot cocoa
-
Tied in cellophane bags as gifts or stocking stuffers
Serve them alongside warm drinks like cider or peppermint hot chocolate for an adorable and cozy treat display.
Nutritional & Health Notes
Melting snowman cookies are a seasonal treat meant to be enjoyed in moderation. While not a health food, they can be made a bit lighter by:
-
Using a small cookie cutter to reduce portion size
-
Swapping for natural coloring and flavoring
-
Reducing added sugar in homemade dough or glaze
Each cookie contains simple ingredients, and with the right swaps, can accommodate a range of dietary needs for group settings.
FAQs
Q1: Can I make these cookies ahead of time?
A1: Yes! You can bake and freeze the sugar cookies up to a month ahead. Decorate them fresh a day or two before serving so the icing stays vibrant and crisp.
Q2: How do I store decorated melting snowman cookies?
A2: Store them in a single layer in an airtight container at room temperature for up to 5 days. If stacking, place wax paper between layers to prevent sticking.
Q3: Can kids help with decorating?
A3: Absolutely! This is a perfect recipe for kids to join in — especially with the decorating part. Provide a variety of edible decorations and let them create their own “melting” snowmen.
Q4: What’s the best icing for these cookies?
A4: Royal icing is best for structure and drying hard, while powdered sugar glaze offers a softer finish. Both work well — choose based on your texture and timing preference.
Q5: Can I use pre-made cookies?
A5: Yes. Store-bought sugar cookies work in a pinch, especially if you’re decorating with kids or making a large batch. Just be sure they have a flat top surface for icing.
Q6: How can I make these cookies allergy-friendly?
A6: Use gluten-free flour for the base, vegan marshmallows, and allergy-friendly candies or homemade icing. Always double-check packaging if sharing with others.
Q7: How do I keep icing from running too much?
A7: Make sure your cookies are completely cool before icing. Use a thicker icing consistency and spoon it gently onto the center, letting it spread naturally without going too far over the edges.
PrintMelting Snowman Cookies That Are Too Cute to Skip
Adorably decorated sugar cookies featuring a “melting snowman” design made with marshmallows and white icing. Perfect for festive holiday fun with kids or creative winter treats.
- Prep Time: 30 minutes
- Cook Time: 10 minutes
- Total Time: 2 hours (includes decorating and setting)
- Yield: 20 cookies 1x
Ingredients
For the cookies:
-
2½ cups all-purpose flour
-
½ tsp baking powder
-
¼ tsp salt
-
¾ cup unsalted butter, softened
-
1 cup granulated sugar
-
1 large egg
-
1 tsp vanilla extract
For the icing:
-
2 cups powdered sugar
-
2–3 tbsp milk
-
½ tsp vanilla or almond extract (optional)
Toppings:
-
Large marshmallows
-
Edible food pens or colored icing
-
Mini chocolate chips, sprinkles, licorice, candy decorations
Instructions
-
Preheat oven to 350°F (175°C). Line baking sheets with parchment.
-
Cream butter and sugar until light. Beat in egg and vanilla.
-
Add dry ingredients and mix into dough. Chill 30 minutes.
-
Roll into balls, flatten slightly, and bake for 8–10 minutes. Cool completely.
-
Mix icing to a thick, pourable consistency. Spoon over cookies, letting it drip naturally.
-
Press a marshmallow into the icing for the snowman’s head.
-
Decorate with eyes, arms, buttons, and scarves using icing or pens.
-
Let set at room temperature for 1–2 hours.
Notes
-
Soften marshmallows slightly for a slumped, melted look.
-
Use natural food dyes and gluten-free flour for dietary adjustments.
-
Store in a single layer to preserve decorations.