
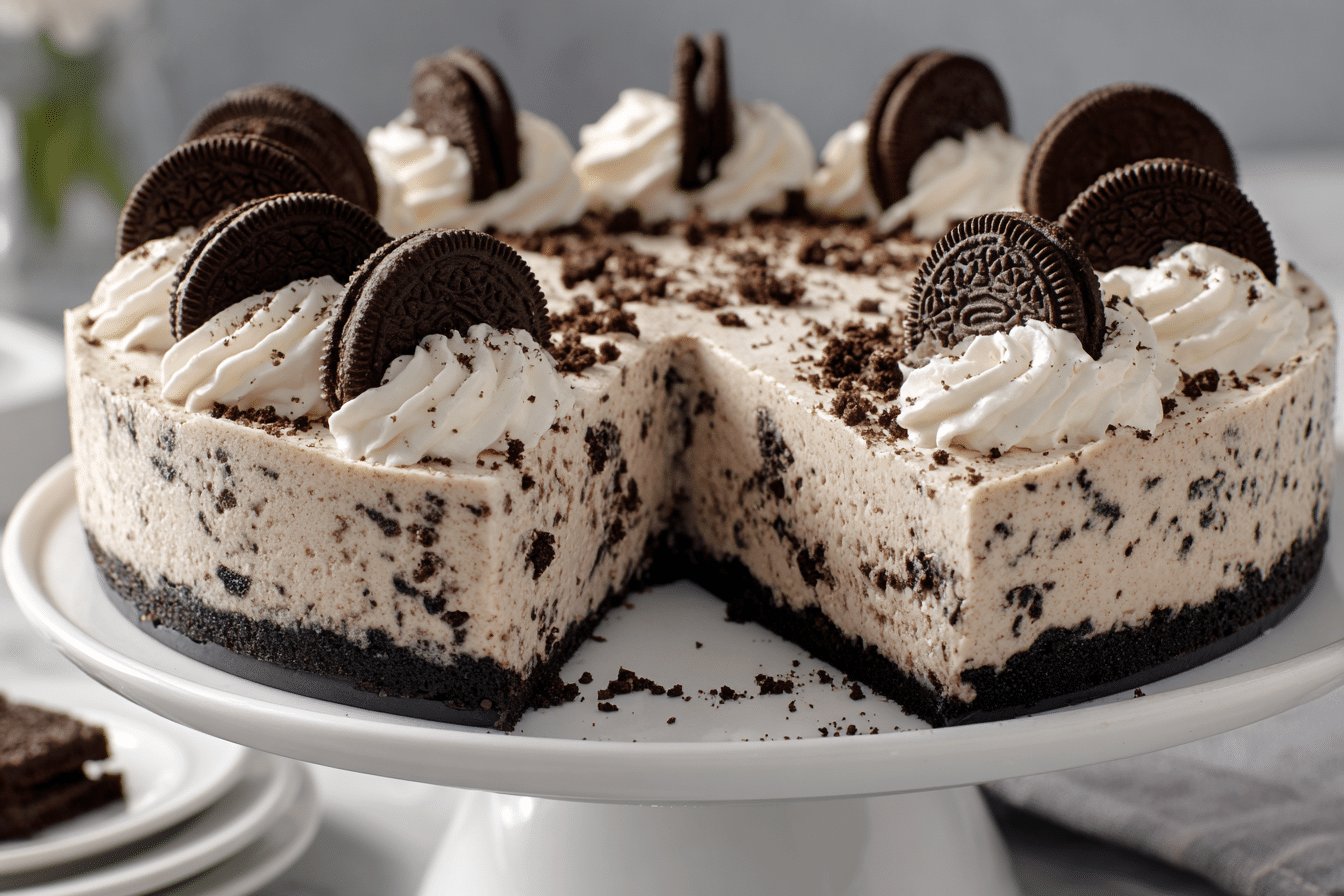
This No-Bake Oreo Cheesecake is the ultimate dessert for cookie lovers and cheesecake fans alike. With a buttery Oreo crust, smooth cream cheese filling, and chunks of crushed cookies throughout, every slice is rich, creamy, and full of that signature cookies-and-cream flavor.
Best of all, it comes together without ever turning on the oven. It’s perfect for warm days, quick prep needs, or those moments when you want an impressive homemade treat without too much effort. Each bite is cool, decadent, and layered with texture—from the crunchy base to the fluffy, mousse-like filling.
Whether you’re hosting a dinner party, celebrating a birthday, or just craving a cozy night-in treat, this Oreo cheesecake delivers indulgence and ease in one perfect slice.
Ingredients Overview
This no-bake dessert uses simple ingredients that come together to create something truly rich and satisfying. Here’s what you’ll need and why each element matters:
For the Crust:
-
Oreo Cookies (24 whole cookies): The base of the cheesecake. The filling helps bind the crust when mixed with melted butter.
-
Unsalted Butter (6 tbsp / 85g, melted): Creates a cohesive crust and adds richness.
For the Filling:
-
Cream Cheese (450g, softened): The heart of the cheesecake. Full-fat cream cheese provides the best texture and flavor.
-
Powdered Sugar (¾ cup / 90g): Sweetens the filling without grittiness.
-
Vanilla Extract (1 tsp): Adds a warm, aromatic base to complement the Oreo flavor.
-
Heavy Whipping Cream (1 cup / 240ml): Whipped and folded in for a light, mousse-like texture.
-
Oreo Cookies (10–12, crushed): Folded into the filling for texture and extra cookie flavor.
For the Topping (Optional but Recommended):
-
Whipped Cream: Adds a soft, cloud-like finish.
-
Crushed Oreos or Mini Oreos: For garnish and texture contrast.
-
Chocolate Shavings or Drizzle: Optional but elevates presentation.
These ingredients create a rich but balanced dessert, with the Oreos providing just the right contrast to the tangy cream cheese and sweet, airy cream.
Step-by-Step Instructions
-
Make the crust:
Add 24 Oreos (whole, with filling) to a food processor and pulse until they form fine crumbs. Alternatively, place them in a zip-top bag and crush with a rolling pin.
In a bowl, combine Oreo crumbs with 6 tbsp melted butter. Stir until the texture resembles wet sand.
Press the mixture firmly into the bottom of a 9-inch (23cm) springform pan. Use the bottom of a measuring cup or glass to pack it tightly and evenly. Chill in the fridge while you make the filling.
-
Prepare the filling:
In a large bowl, beat 450g softened cream cheese with ¾ cup powdered sugar and 1 tsp vanilla extract until smooth and creamy (about 2 minutes).
In a separate bowl, whip 1 cup of cold heavy cream until stiff peaks form. Gently fold the whipped cream into the cream cheese mixture using a spatula. Work slowly to keep the mixture light and airy.
Fold in 10–12 roughly crushed Oreos, leaving a few larger chunks for texture.
-
Assemble the cheesecake:
Pour the filling over the prepared crust. Smooth the top with a spatula and gently tap the pan on the counter to release air bubbles.
Cover with plastic wrap and refrigerate for at least 6 hours, or overnight for best results. This helps the cheesecake set and slice cleanly.
-
Decorate and serve:
Once set, remove the cheesecake from the pan and transfer to a serving plate.
Top with swirls of whipped cream, crushed Oreos, or even a chocolate drizzle for a bakery-style finish.
Slice with a warm knife for clean edges and serve chilled.
Tips, Variations & Substitutions
-
Use full-fat cream cheese: For the creamiest texture and most stable filling, avoid low-fat versions.
-
Don’t skip the chill: The cheesecake needs several hours in the fridge to fully set. Overnight is ideal.
-
Make individual portions: Use small jars or ramekins to create mini Oreo cheesecakes—perfect for parties.
-
Flavor twist: Add a pinch of espresso powder or a splash of coffee liqueur for mocha Oreo vibes.
-
Lighter version: Use Greek yogurt in place of part of the cream cheese and opt for light whipped topping.
-
Gluten-free option: Use gluten-free sandwich cookies in place of Oreos.
Serving Ideas & Occasions
This no-bake Oreo cheesecake is a showstopper on any dessert table. It’s rich enough for a celebration, yet easy enough to whip up on a casual weekend.
Serve it at:
-
Birthday parties
-
Potlucks or BBQs
-
Holiday gatherings
-
Date night desserts
-
No-fuss dinner party finales
Pair it with a cold glass of milk, a strong cup of coffee, or a scoop of vanilla ice cream. It also makes a fantastic “make-ahead” dessert—you can prepare it the night before and relax the day of your event.
Nutritional & Health Notes
While this dessert is indulgent, it’s portion-controlled and incredibly satisfying. Using real cream cheese and cream means each slice is rich, so you won’t need a large serving to feel content.
To slightly lighten the dessert:
-
Use reduced-fat cream cheese (not fat-free)
-
Cut sugar by 1–2 tablespoons
-
Top with fresh berries instead of whipped cream
A typical slice contains about 350–400 calories depending on toppings, which is reasonable for a dessert this decadent.
FAQs
1. Can I freeze no-bake Oreo cheesecake?
Yes. Once fully set, wrap tightly and freeze for up to 2 months. Thaw in the fridge overnight before serving. Note: Whipped cream toppings may deflate after freezing—add fresh after thawing.
2. How long does it last in the fridge?
The cheesecake will keep well for 4–5 days in the refrigerator, covered tightly. The crust may soften slightly over time but will still taste great.
3. Can I make it without a springform pan?
Yes. Use a standard 9-inch pie dish or a square baking pan lined with parchment for easy lifting. You may not get the same clean edges, but it will still slice and serve well.
4. Can I use Cool Whip instead of whipped cream?
You can. Use 2½ cups of thawed whipped topping in place of freshly whipped cream. It provides a slightly sweeter, more stabilized result.
5. What if my filling is too soft?
Make sure the cream cheese is fully softened before mixing, and the whipped cream is beaten to stiff peaks. Also, be sure to chill for at least 6 hours. If the filling still seems loose, extra chilling time usually solves it.
6. Can I make this cheesecake without added sugar?
The Oreos add plenty of sweetness, so you can reduce the powdered sugar to ½ cup or even less. Taste as you go to suit your preference.
7. What’s the best way to crush Oreos without a processor?
Place them in a zip-top bag and crush with a rolling pin or a heavy pan. Try to get them finely crushed for the base and more coarsely crushed for the filling.
Chocolate Cream No-Bake Oreo Cheesecake
Rich, creamy no-bake Oreo cheesecake with a cookie crust, fluffy filling, and crunchy cookie bits throughout. A simple, crowd-pleasing dessert that never fails.
- Prep Time: 20 minutes
- Cook Time: 0 minutes
- Total Time: 6 hours 20 minutes (includes chilling)
- Yield: 10–12 slices
Ingredients
For the crust:
24 Oreo cookies
6 tbsp (85g) unsalted butter, melted
For the filling:
450g cream cheese, softened
¾ cup (90g) powdered sugar
1 tsp vanilla extract
1 cup (240ml) heavy whipping cream
10–12 Oreo cookies, crushed
Optional toppings:
Whipped cream
Crushed Oreos
Chocolate drizzle
Instructions
-
Crush 24 Oreos into fine crumbs. Mix with melted butter and press into the base of a 9-inch springform pan. Chill.
-
Beat cream cheese, powdered sugar, and vanilla until smooth.
-
Whip cream to stiff peaks. Fold into cream cheese mixture.
-
Fold in crushed Oreos.
-
Spread filling over crust. Smooth the top.
-
Cover and chill for at least 6 hours or overnight.
-
Remove from pan, decorate with whipped cream and crushed Oreos. Slice and serve.
Notes
Use full-fat cream cheese for best results. Can be frozen and thawed in the fridge.