
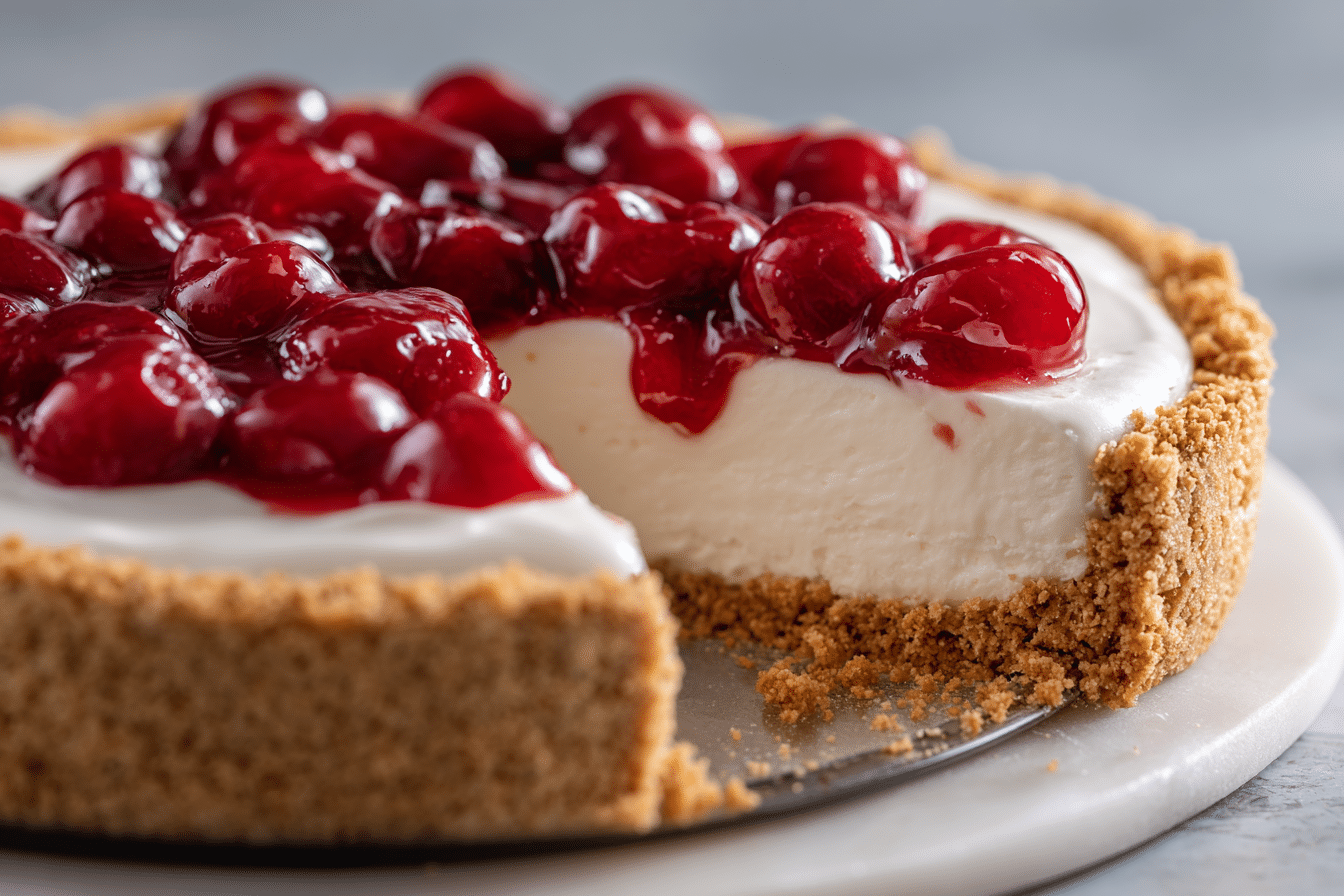
This amazing no bake cheesecake recipe is everything you want in a dessert: smooth, creamy, rich, and impossibly easy. Inspired by classic cheesecake but without the need for an oven, this version delivers that luscious texture with none of the stress. It sets up beautifully in the fridge, making it ideal for warm-weather treats or busy days when you need a fuss-free dessert.
With a buttery graham cracker crust and a velvety filling that’s lightly sweetened and perfectly tangy, this cheesecake is a total crowd-pleaser. The texture is fluffy yet dense enough to slice cleanly. And the best part? It comes together in under 20 minutes, then chills until ready to serve.
Perfect for parties, holidays, or simple weeknight indulgence, this no-bake cheesecake tastes like you spent hours—when it’s really just minutes.
Ingredients Overview
Each element of this no-bake cheesecake is chosen for maximum flavor, texture, and ease.
Graham cracker crumbs form the classic cheesecake base. They provide a nutty, toasty crunch that contrasts beautifully with the creamy filling. You can substitute digestive biscuits, vanilla wafers, or even gingersnaps for a different twist.
Melted butter binds the crust together. It also adds richness and helps the crust firm up once chilled. Salted or unsalted both work here.
Granulated sugar sweetens the crust slightly and helps it set. In the filling, it balances the tanginess of the cream cheese.
Cream cheese is the star of the show. Use full-fat, block-style cream cheese for the best texture—no tubs or whipped versions. Make sure it’s softened to avoid lumps.
Heavy cream or whipping cream gives the cheesecake its light, airy texture when whipped and folded into the cream cheese. It helps the filling hold its shape without gelatin.
Powdered sugar is used instead of granulated sugar in the filling to create a smooth consistency that dissolves easily.
Vanilla extract brings warmth and balance. It rounds out the tanginess of the cream cheese and makes the dessert taste complete.
Optional toppings like fresh fruit, fruit compote, or chocolate shavings can personalize your cheesecake without altering the base recipe.
Step-by-Step Instructions
Step 1: Make the Crust
In a medium bowl, combine 1 1/2 cups graham cracker crumbs, 1/4 cup granulated sugar, and 6 tablespoons melted butter. Stir until evenly moistened and the mixture resembles wet sand.
Press the crumb mixture firmly into the bottom of a 9-inch springform pan or pie dish. Use the bottom of a measuring cup or glass to flatten evenly.
Place the crust in the fridge or freezer to set while you prepare the filling—about 10 minutes.
Step 2: Make the Filling
In a large bowl, beat 16 ounces of softened cream cheese until smooth and creamy—about 2–3 minutes.
Add 3/4 cup powdered sugar and 1 1/2 teaspoons vanilla extract. Beat again until fully combined and smooth.
In a separate bowl, whip 1 cup of cold heavy cream to stiff peaks using a hand mixer or stand mixer. This takes about 3–4 minutes on high speed.
Gently fold the whipped cream into the cream cheese mixture in two additions. Use a spatula and take your time to keep the filling light and airy.
Step 3: Assemble the Cheesecake
Remove the crust from the fridge. Spoon the filling on top and spread evenly using an offset spatula or the back of a spoon.
Smooth the top and tap the pan gently on the counter to release any air bubbles.
Cover loosely with plastic wrap and refrigerate for at least 4 hours, or overnight for best texture.
Step 4: Garnish and Serve
Just before serving, top with sliced strawberries, blueberries, a berry compote, or even lemon curd or chocolate drizzle.
Slice using a warm knife for clean cuts.
Tips, Variations & Substitutions
Tips for Success:
-
Use softened cream cheese for a lump-free filling.
-
Chill the crust before adding the filling—it helps it stay firm.
-
Whip the cream separately for best texture—don’t shortcut by mixing it into the cream cheese directly.
Flavor Variations:
-
Add lemon zest to the filling for a citrusy version.
-
Swirl in melted chocolate or peanut butter before chilling.
-
Use crushed Oreos or Biscoff cookies instead of graham crackers for the crust.
Dietary Swaps:
-
Use gluten-free graham crackers for a gluten-free crust.
-
For a lower sugar option, use a sugar substitute that works in no-bake desserts.
-
Swap coconut cream for heavy cream for a dairy-free alternative (texture may vary).
Serving Ideas & Occasions
This amazing no bake cheesecake is incredibly versatile. It’s a perfect make-ahead dessert for holidays like Easter or Thanksgiving, and elegant enough for birthdays, dinner parties, or baby showers.
Serve it with macerated berries, a drizzle of caramel, or a spoonful of jam. It also shines with crushed pistachios or toasted coconut.
Cut into bars or mini portions for a dessert table or buffet. It travels well and holds up beautifully when chilled.
Pair with coffee, tea, or sparkling rosé for a complete dessert experience.
Nutritional & Health Notes
While no-bake cheesecake is rich, it’s free from preservatives and additives you’d find in boxed mixes or store-bought desserts.
A standard slice contains around 300–350 calories, mostly from fats and carbs. Portion control is key—thanks to its richness, a small slice satisfies.
Using fresh fruit on top adds natural sweetness, fiber, and visual appeal. If you’re reducing sugar, try reducing the crust sugar or using a natural sugar substitute in the filling.
This dessert is naturally egg-free and can be made gluten-free or dairy-free with simple swaps.
FAQs
Can I freeze no bake cheesecake?
Yes! Once fully set, wrap tightly in plastic and foil, then freeze for up to 1 month. Thaw in the fridge before serving.
How long does no bake cheesecake take to set?
It needs at least 4 hours in the fridge, but overnight is best for clean slicing and firm texture.
Why is my cheesecake filling too soft?
Make sure the whipped cream reached stiff peaks before folding it in, and don’t overmix once combined. Always chill fully before slicing.
Can I use Cool Whip instead of heavy cream?
Yes, substitute with an equal amount of thawed Cool Whip. The texture will be slightly softer but still delicious.
What kind of pan should I use?
A springform pan is ideal for clean edges and easy release. A pie dish or square pan also works, though serving slices may be trickier.
Can I make this ahead of time?
Absolutely. No bake cheesecake is perfect for making 1–2 days ahead. Add fresh toppings just before serving for best results.
What toppings go best with this cheesecake?
Fresh berries, jam, lemon curd, caramel, chocolate ganache, or even crushed cookies. Keep it simple or dress it up—it’s your call.
Creamy No Bake Cheesecake Recipe Everyone Loves
This amazing no bake cheesecake features a buttery graham cracker crust and a light, creamy filling made with whipped cream and cream cheese. It’s quick to make, beautifully smooth, and perfect for any occasion.
- Prep Time: 20 minutes
- Cook Time: 0 minutes
- Total Time: 4 hours 20 minutes
- Yield: 8–10 slices
Ingredients
Crust:
1 1/2 cups graham cracker crumbs
1/4 cup granulated sugar
6 tbsp unsalted butter, melted
Filling:
16 oz cream cheese, softened
3/4 cup powdered sugar
1 1/2 tsp vanilla extract
1 cup cold heavy whipping cream
Instructions
-
Mix graham cracker crumbs, sugar, and butter. Press into a springform pan. Chill while making filling.
-
Beat cream cheese until smooth. Add powdered sugar and vanilla. Mix well.
-
In a separate bowl, whip cream to stiff peaks.
-
Gently fold whipped cream into cream cheese mixture in two batches.
-
Spread filling over crust. Smooth top.
-
Chill at least 4 hours or overnight.
-
Top with fruit or garnish before serving.
Notes
Use block cream cheese, not spreadable.
Whip cream separately for best texture.
Chill fully for clean slices.