
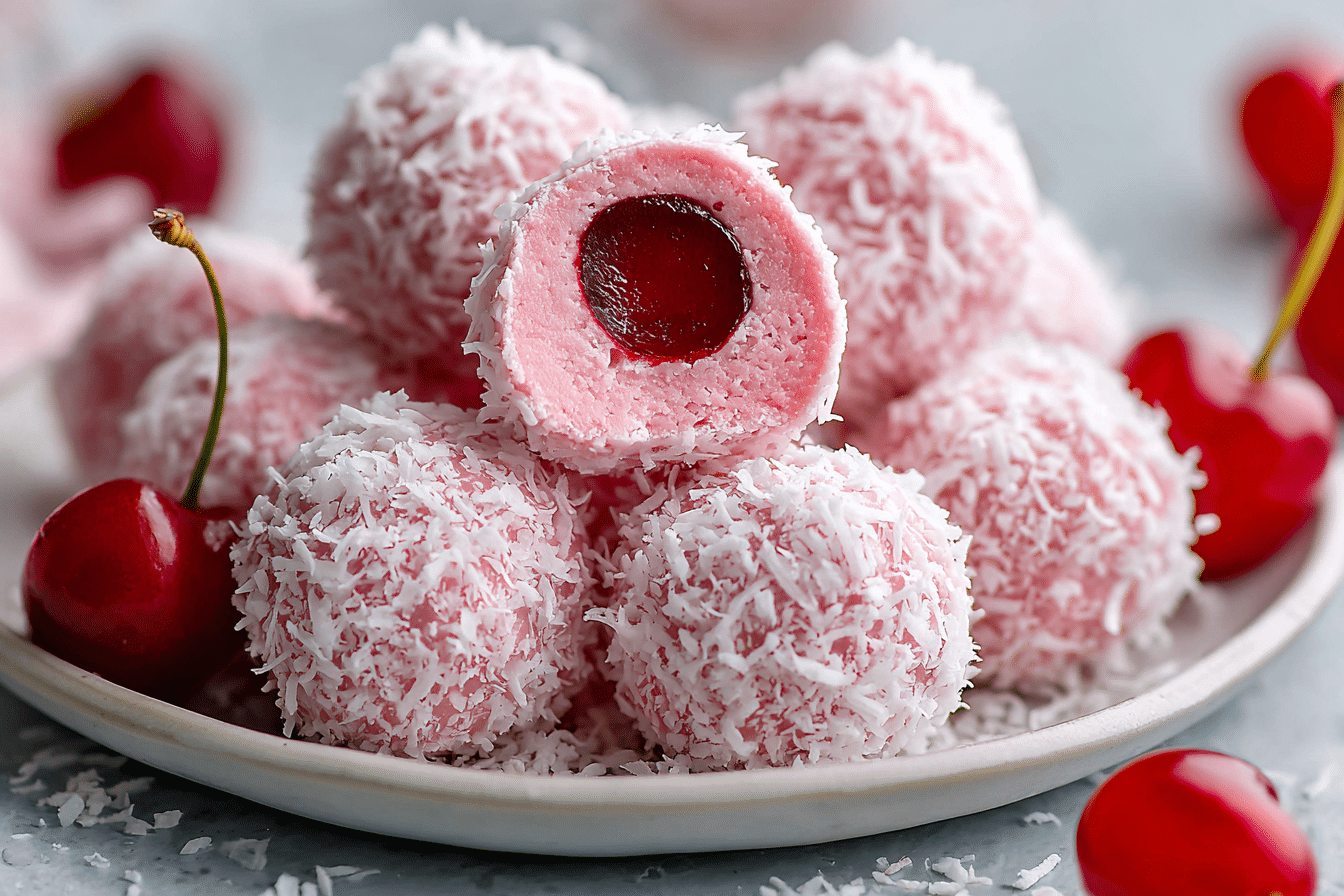
Cherry Mash Truffles are a beloved vintage treat reimagined into easy, no-bake bites that melt in your mouth with every fudgy, cherry-filled center. Inspired by the classic Cherry Mash candy bar from soda fountains and five-and-dimes of decades past, these truffles combine the sweet richness of cherry frosting, crushed peanuts, and smooth chocolate into bite-sized delights.
They’re the kind of dessert that stirs up memories—bright pink centers, crunchy nutty shells, and a soft texture that tastes like something grandma would have hidden in the back of the fridge. This no-bake recipe takes just minutes to prepare and is perfect for holidays, parties, or gifting.
And while they look impressive, the process couldn’t be easier. You don’t need candy thermometers or fancy molds—just a bowl, a microwave, and a sweet tooth.
Ingredients Overview
Cherry Mash Truffles are built from simple, pantry-friendly ingredients that come together to mimic the beloved flavors of the original candy.
Maraschino Cherries: These bring the signature cherry flavor and that vibrant pink hue. Be sure to drain them well and chop finely to avoid excess moisture.
Powdered Sugar: Forms the bulk of the filling and helps create a firm, scoopable texture. It also balances the tartness of the cherries.
Butter: Adds richness to the filling and helps it set when chilled. Use unsalted for better flavor control.
Cherry Juice (from the jar): Just a spoonful gives the truffle centers that signature color and enhances the cherry flavor.
Peanut Butter (optional): A touch of creamy peanut butter deepens the flavor and gives a nostalgic nod to the original Cherry Mash bar.
Vanilla Extract: Adds warmth and rounds out the sweetness.
Chocolate Chips: A mix of milk chocolate and semi-sweet chocolate creates a smooth coating that balances the sugary center.
Crushed Peanuts: These give the outer shell its crunch and a bit of salty contrast to the sweet filling. Roasted, unsalted peanuts are ideal.
Coconut Oil (or shortening): Helps thin the melted chocolate for easy dipping and adds shine to the finish.
Step-by-Step Instructions
-
Prep the filling: In a mixing bowl, beat ¼ cup softened butter with 1½ cups powdered sugar until smooth. Add ½ teaspoon vanilla, 1 tablespoon cherry juice from the maraschino jar, and 2 tablespoons finely chopped maraschino cherries. If using peanut butter, mix in 2 tablespoons now.
-
Adjust texture: If the mixture is too soft, add more powdered sugar, 2 tablespoons at a time, until it holds its shape but remains scoopable.
-
Shape the centers: Roll the cherry mixture into 1-inch balls and place them on a parchment-lined baking sheet. Chill in the freezer for 30 minutes or until firm.
-
Crush the peanuts: While the centers are chilling, finely chop or crush ½ cup roasted peanuts. Set aside in a shallow dish for coating.
-
Melt the chocolate: In a microwave-safe bowl, combine 1 cup milk chocolate chips, 1 cup semi-sweet chocolate chips, and 1 tablespoon coconut oil. Microwave in 30-second intervals, stirring between each, until smooth and glossy.
-
Coat the truffles: Using a fork or dipping tool, dip each chilled cherry center into the melted chocolate. Let the excess drip off, then roll in crushed peanuts. Place back on the baking sheet.
-
Chill again: Once all truffles are coated, refrigerate for 15–20 minutes until the chocolate is set.
-
Store or serve: Keep truffles stored in the fridge in an airtight container. They last up to one week and taste even better after a day.
Tips, Variations & Substitutions
Use gloves: The cherry filling can be sticky—wearing gloves while shaping makes cleanup easier.
No peanut butter? You can skip it or use almond butter for a slightly different flavor twist.
Make it nut-free: Substitute crushed graham crackers or toasted coconut for the peanut coating if allergies are a concern.
Add a crunch: Fold mini chocolate chips or chopped nuts into the cherry center for added texture.
Coating variations: Dip in white chocolate or dark chocolate for contrast and drizzle with melted pink candy melts for a festive finish.
Decorative touch: Top each truffle with a small piece of maraschino cherry or a pink sprinkle before the chocolate sets.
Holiday-ready: These make a perfect addition to Valentine’s Day platters or cookie trays around Christmas.
Serving Ideas & Occasions
Cherry Mash Truffles are ideal for gifting and sharing. Their vintage charm makes them perfect for retro-themed parties, holiday dessert spreads, or baby showers with a pink palette.
Serve chilled on a dessert tray alongside other nostalgic sweets like fudge, peanut clusters, or buckeyes. You can even box them up in pretty paper cups and wrap them as thoughtful homemade gifts.
They also make a sweet treat for after-school snacks, book clubs, or as a quick indulgence with a cup of tea or coffee.
Nutritional & Health Notes
While Cherry Mash Truffles are undoubtedly a treat, they’re portion-controlled, meaning just one or two are enough to satisfy a sweet craving. Using real cherries, natural peanut butter, and dark chocolate can make them feel just a little more balanced than store-bought candy.
If you’re watching refined sugars, opt for reduced sugar chocolate chips and make your own cherry filling with dried cherries and a natural sweetener like maple syrup. These adjustments won’t fully recreate the classic but can give a more wholesome spin.
Keep in mind they are rich in sugar and fat, so they’re best enjoyed in moderation.
FAQs
1. Can I use fresh cherries instead of maraschino?
Fresh cherries aren’t ideal for this recipe since they contain more moisture and lack the bold sweetness of maraschino cherries. For a natural option, use dried cherries softened in warm water.
2. How long do these truffles last?
Stored in an airtight container in the fridge, they’ll stay fresh for up to 7 days. For longer storage, freeze in a sealed bag for up to a month.
3. Do I have to use peanut butter?
No, it’s optional. It adds richness and nostalgia, but you can omit it for a cleaner cherry flavor or swap in another nut or seed butter.
4. Can I make these ahead for a party?
Yes, Cherry Mash Truffles are perfect for making ahead. Just keep them refrigerated and take them out 10 minutes before serving for the best texture.
5. What’s the best way to crush the peanuts?
Use a food processor for a fine crumb or place them in a zip-top bag and crush with a rolling pin. Aim for small bits, not powder.
6. How do I make them extra firm for gifting?
Chill them well after each step and use a firmer cherry mixture by increasing powdered sugar. A double-dip in chocolate also helps create a sturdy shell.
7. Can I use a different type of chocolate?
Absolutely. Use white chocolate for a creamy sweetness or dark chocolate for a richer contrast. Just adjust sweetness based on your coating choice.
Easy Cherry Truffle Candy Made at Home
A nostalgic, no-bake Cherry Mash Truffle recipe with a soft cherry center, chocolate coating, and crushed peanut shell—perfect for gifting or snacking.
- Prep Time: 20 minutes
- Cook Time: 0 minutes
- Total Time: 50 minutes (including chilling)
- Yield: 20 truffles 1x
Ingredients
¼ cup unsalted butter, softened
1½ cups powdered sugar (plus more as needed)
2 tablespoons finely chopped maraschino cherries
1 tablespoon cherry juice (from jar)
½ teaspoon vanilla extract
2 tablespoons peanut butter (optional)
1 cup milk chocolate chips
1 cup semi-sweet chocolate chips
1 tablespoon coconut oil
½ cup crushed roasted peanuts
Instructions
-
Beat butter and powdered sugar until smooth.
-
Add vanilla, cherry juice, cherries, and peanut butter (if using). Mix until combined.
-
Adjust texture with extra powdered sugar if too soft.
-
Roll into 1-inch balls. Freeze for 30 minutes.
-
Melt chocolate chips and coconut oil until smooth.
-
Dip cherry balls into chocolate, then roll in crushed peanuts.
-
Place on lined tray and chill until set.
-
Store in the fridge in an airtight container.
Notes
Use gloves for easy shaping. Freeze before coating to help truffles hold their shape.