
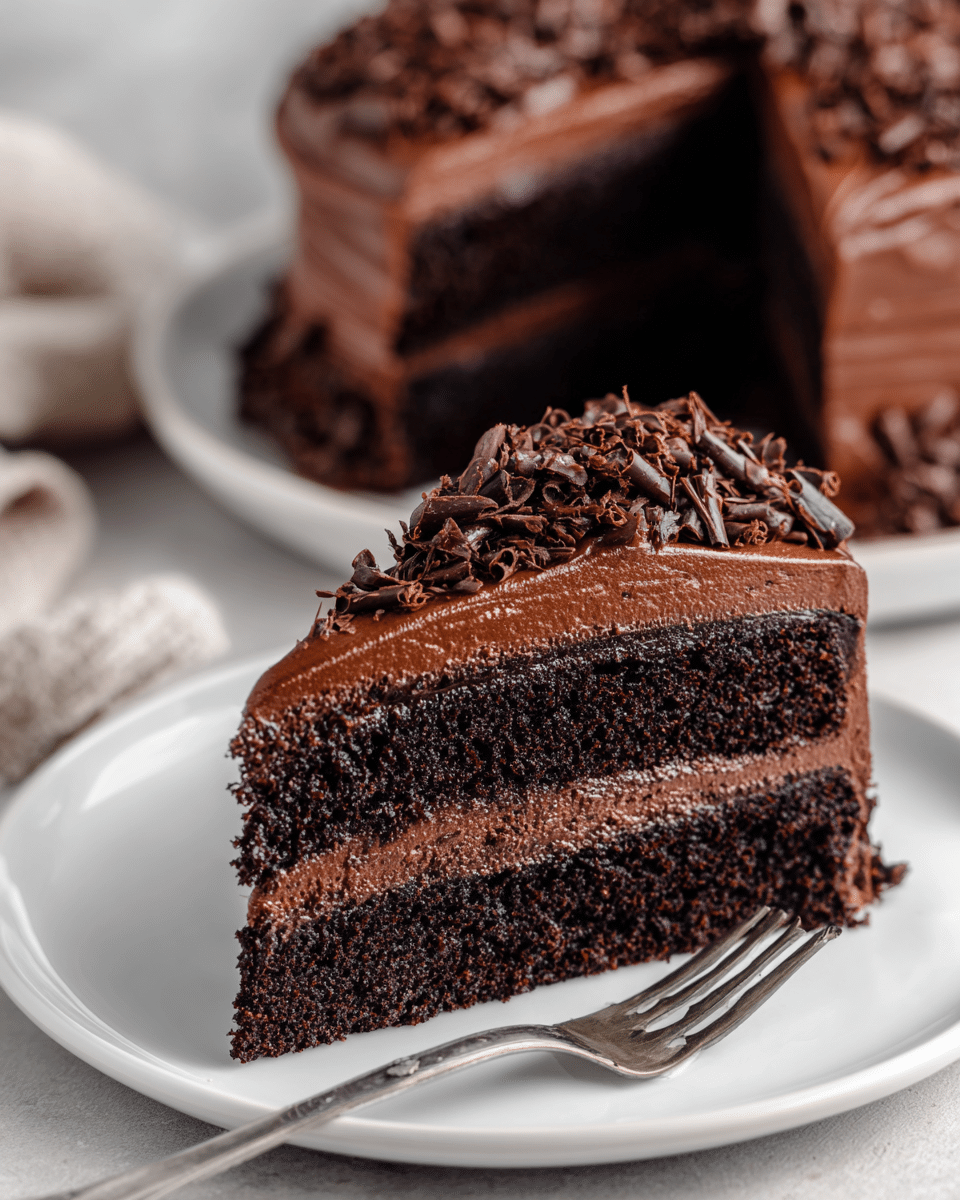
If you’re searching for a dessert that stuns on sight and satisfies every chocolate craving, this Triple-Layer Chocolate Mousse Cake is the one. With three distinct layers—each with its own texture and intensity—this cake delivers a luxurious experience in every bite. It’s the kind of showstopper that commands attention at birthdays, holidays, or elegant dinner parties.
This recipe isn’t just about decadence—it’s also about balance. A rich, flourless chocolate cake forms the base, followed by a silky milk chocolate mousse, topped with a light-as-air white chocolate mousse. It’s a journey through the spectrum of chocolate, from deep and dark to creamy and delicate.
A Brief Origin: The Story Behind the Mousse Cake
The chocolate mousse cake is a fusion of classic French patisserie and modern layer cake artistry. While chocolate mousse itself dates back to the 18th century in France, the multi-layer mousse cake gained popularity in upscale patisseries and fine-dining restaurants during the 1980s and 90s, where chefs wanted to bring depth and contrast to a single dessert.
This version layers a fudgy baked base with airy whipped mousse, creating a contrast of textures that feels indulgent yet refined. What makes this cake especially appealing is its versatility—serve it chilled in summer, or slightly tempered in cooler weather to emphasize the richness.
Ingredient Breakdown: What Each Element Brings
Let’s go layer by layer and break down the purpose and personality of each ingredient in this chocolate lover’s dream.
Bottom Layer: Flourless Chocolate Cake
-
Bittersweet Chocolate (70% cacao): Delivers intense, rich chocolate flavor without being too sweet.
-
Unsalted Butter: Provides structure and creaminess to the base.
-
Granulated Sugar: Sweetens and balances the bitterness of the dark chocolate.
-
Eggs: Add lift, richness, and help bind the base as it bakes.
-
Vanilla Extract & Salt: Enhance flavor and complexity.
Middle Layer: Milk Chocolate Mousse
-
Milk Chocolate: Offers a sweeter, more mellow contrast to the base layer.
-
Heavy Cream: Whipped and folded in to give the mousse its signature light texture.
-
Gelatin: Stabilizes the mousse so it holds its shape once chilled.
-
Egg Yolks (optional): Add richness and create a smoother mouthfeel when tempered into the chocolate.
Top Layer: White Chocolate Mousse
-
White Chocolate: Adds a creamy, sweet cap that balances the entire dessert.
-
Heavy Cream: Used both to melt the chocolate and to whip into light mousse.
-
Gelatin: Ensures the mousse firms up properly without collapsing.
Garnishes (Optional but Recommended)
-
Chocolate curls or shavings
-
Cocoa powder dusting
-
Fresh berries or gold leaf for elegance
Each layer supports the next, both structurally and in flavor, creating a harmonious, tiered dessert that’s as beautiful to slice as it is to serve.
Step-by-Step Instructions: Creating the Layers
This cake involves some cooling and chilling time, so plan ahead. A springform pan and acetate cake collar are helpful, but not required.
Step 1: Prepare the Bottom Layer (Flourless Chocolate Cake)
-
Preheat oven to 325°F (160°C). Grease and line the base of a 9-inch springform pan.
-
Melt 6 oz (170g) bittersweet chocolate with ½ cup (113g) butter over a double boiler or in short microwave bursts.
-
Stir until smooth. Let cool slightly.
-
Whisk in ¾ cup sugar, 1 tsp vanilla extract, and ¼ tsp salt.
-
Beat in 3 large eggs, one at a time.
-
Pour into the prepared pan and bake for 20–22 minutes or until set with a slight jiggle in the center.
-
Cool completely in the pan before adding the next layer.
Step 2: Prepare the Milk Chocolate Mousse
-
Bloom 1½ tsp unflavored gelatin in 2 tbsp cold water. Let sit 5 minutes.
-
Melt 6 oz (170g) milk chocolate over a double boiler until smooth.
-
In a small saucepan, heat ¼ cup cream until just warm. Add bloomed gelatin and stir until fully dissolved.
-
Stir the warm gelatin-cream mixture into the melted chocolate.
-
Cool to room temperature, stirring occasionally.
-
Whip ¾ cup heavy cream to soft peaks. Gently fold into the chocolate mixture.
-
Pour over the cooled cake layer. Use an offset spatula to smooth the top.
-
Refrigerate for at least 1 hour, or until firm.
Step 3: Prepare the White Chocolate Mousse
-
Bloom 1½ tsp gelatin in 2 tbsp cold water.
-
Melt 6 oz (170g) white chocolate until smooth.
-
Heat ¼ cup cream, dissolve the bloomed gelatin in it, and combine with melted white chocolate.
-
Let cool to room temperature.
-
Whip ¾ cup cream to soft peaks and gently fold into the chocolate.
-
Pour over the set milk chocolate mousse layer. Smooth the top.
-
Chill the cake for at least 4–6 hours, preferably overnight.
Step 4: Release and Decorate
-
Run a hot knife around the edge of the springform pan, then release.
-
Garnish with chocolate curls, dust with cocoa, or decorate with berries or edible flowers.
-
For clean slices, use a sharp knife dipped in hot water and wiped between cuts.
Tips, Variations & Chef Secrets
Pro Tips:
-
Cool each layer completely before adding the next to prevent melting.
-
Don’t skip blooming the gelatin—this ensures it activates properly.
-
Whip cream only to soft peaks so it folds easily into the chocolate.
Flavor Variations:
-
Dark Chocolate Topper: Swap the white chocolate mousse for dark chocolate if you want a richer, more uniform profile.
-
Mocha Mousse Layer: Add 1 tsp instant espresso powder to the milk chocolate mousse.
-
Nutty Crunch: Add a layer of crushed hazelnut praline between the cake and mousse.
Dietary Substitutions:
-
Gluten-Free: Already gluten-free thanks to the flourless base.
-
Dairy-Free: Use dairy-free chocolate and coconut cream (chilled overnight) whipped in place of heavy cream.
-
Egg-Free: Skip yolks in mousse layers and ensure the flourless base is made with egg substitutes like aquafaba.
Serving Ideas & Perfect Occasions
This cake is ideal for events where you want your dessert to steal the spotlight.
Serve It At:
-
Anniversaries & Birthdays: Dress it up with gold leaf or edible pearls.
-
Holidays: A centerpiece for Christmas, Valentine’s Day, or New Year’s.
-
Weddings & Baby Showers: Mini versions in rings or jars for individual servings.
-
Dinner Parties: Serve with a glass of dessert wine or espresso for a sophisticated pairing.
Pair with a raspberry coulis or tart fruit for a flavor contrast that cuts through the richness.
Nutritional & Health Notes
This is an indulgent dessert, but here’s what you should know:
-
Moderate Portions Go a Long Way: The richness makes small slices deeply satisfying.
-
Antioxidants: Dark chocolate is rich in flavonoids and has heart-healthy compounds.
-
Protein & Calcium: From cream and chocolate, you get some nutritional benefits.
-
Low Carb Option: Swap sugar for a granulated sugar substitute and use sugar-free chocolate.
You can always lighten the white chocolate mousse with extra whipped cream or Greek yogurt for a fluffier finish.
Frequently Asked Questions
1. Can I make this cake ahead of time?
Yes. It actually improves with time. Make it up to 2 days in advance, store it covered in the fridge, and garnish just before serving.
2. Can I use agar agar instead of gelatin?
Yes, but agar sets more firmly. Use about ¾ tsp agar powder per 1½ tsp gelatin and boil it to activate before mixing with the mousse base.
3. How do I prevent the mousse layers from sinking or blending?
Cool each mousse mixture to room temperature before layering. Always pour mousse over a fully set base. Use acetate strips for cleaner edges.
4. What’s the best chocolate to use?
Use couverture chocolate or high-quality baking bars. Avoid chocolate chips, as they often contain stabilizers and don’t melt as smoothly.
5. Can I freeze the mousse cake?
Yes. Once fully assembled and chilled, wrap tightly and freeze for up to 1 month. Thaw in the fridge overnight before slicing.
6. Can I make it without a springform pan?
Yes, but it’s easier with one. Alternatively, use a parchment-lined cake ring or acetate collar on a cake board or deep dish.
7. Why is my mousse grainy or separated?
This often happens when chocolate and cream are at very different temperatures. Make sure both components are close to room temp before folding together.
Elegant Chocolate Cake Recipe – Layered Mousse Perfection
This Decadent Triple-Layer Chocolate Mousse Cake features a flourless chocolate base, silky milk chocolate mousse, and fluffy white chocolate mousse—a luxurious dessert perfect for any celebration.
- Prep Time: 45 minutes
- chill time: 6 hours
- Cook Time: 20 minutes
- Total Time: 7 hours 10 minutes
Ingredients
Bottom Layer (Flourless Cake):
-
6 oz (170g) bittersweet chocolate (70%)
-
½ cup (113g) unsalted butter
-
¾ cup granulated sugar
-
3 large eggs
-
1 tsp vanilla extract
-
¼ tsp salt
Milk Chocolate Mousse:
-
6 oz (170g) milk chocolate
-
¾ cup heavy cream (whipped)
-
¼ cup cream (heated)
-
1½ tsp unflavored gelatin
-
2 tbsp cold water (to bloom gelatin)
White Chocolate Mousse:
-
6 oz (170g) white chocolate
-
¾ cup heavy cream (whipped)
-
¼ cup cream (heated)
-
1½ tsp unflavored gelatin
-
2 tbsp cold water (to bloom gelatin)
Instructions
-
Preheat oven to 325°F. Prepare springform pan.
-
Melt chocolate and butter for base. Stir in sugar, vanilla, salt, then eggs. Bake 20–22 min. Cool.
-
Bloom gelatin for milk mousse. Melt chocolate, combine with heated cream and gelatin. Cool, fold in whipped cream. Pour over base. Chill 1 hour.
-
Repeat process for white chocolate mousse. Pour over set milk mousse. Chill 4+ hours.
-
Garnish and serve chilled
Notes
-
Use high-quality chocolate for best results.
-
Chill each layer thoroughly before adding the next.
-
Store up to 4 days refrigerated or freeze for longer storage.