
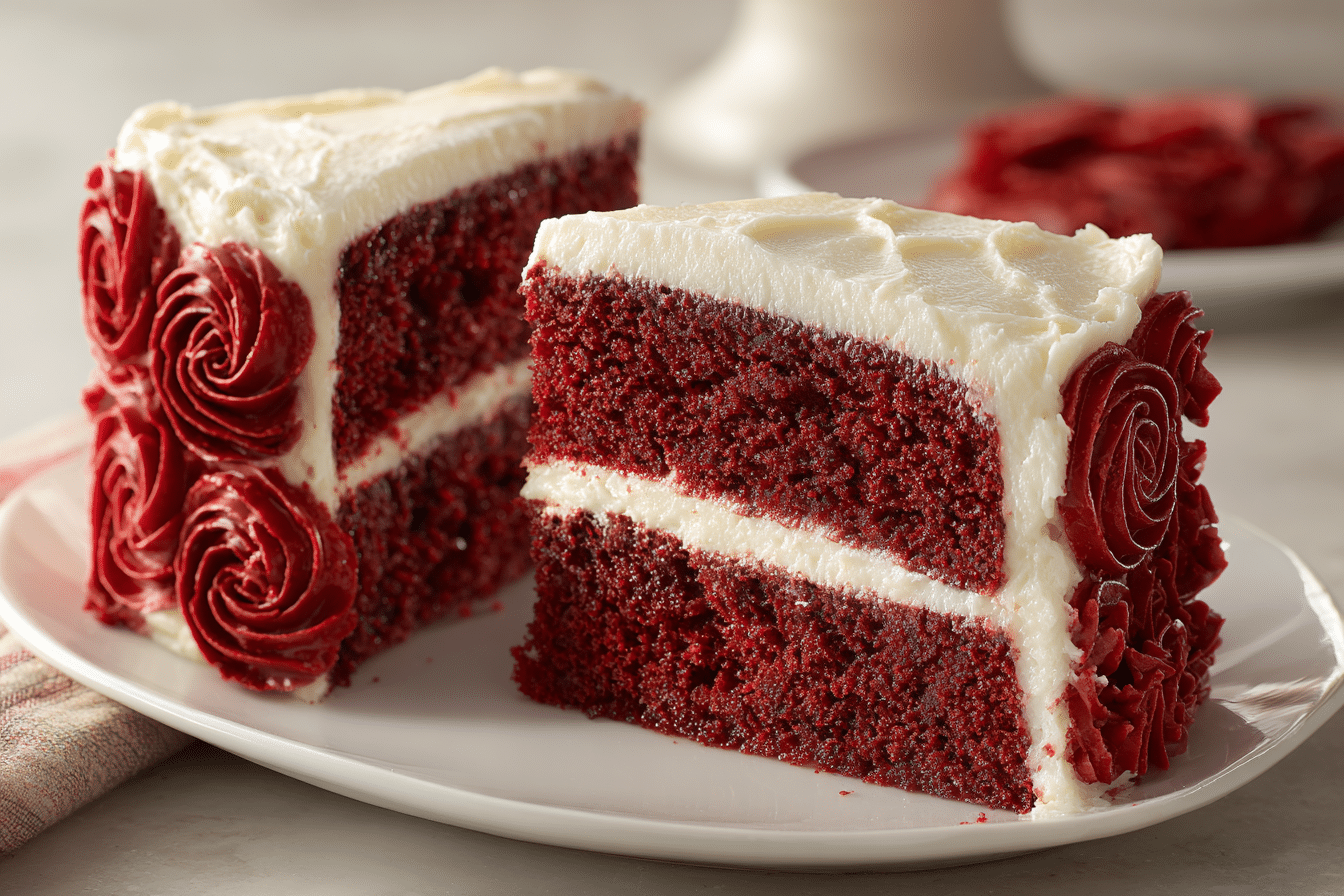
A red velvet buttermilk cake is more than just a stunning dessert — it’s a Southern classic known for its signature red hue, plush texture, and subtle tang that sets it apart from basic chocolate cake. Thanks to the richness of buttermilk, a hint of cocoa, and velvety cream cheese frosting, this cake is balanced, moist, and incredibly flavorful.
Whether you’re baking it for a birthday, holiday, or special occasion, this red velvet cake delivers that nostalgic charm with a tender crumb and show-stopping color. It bakes beautifully in layers, as cupcakes, or even in a sheet pan — versatile and always a crowd-pleaser.
Ingredients Overview
All-Purpose Flour
-
The main structure of the cake.
-
Sift for a finer crumb.
Cocoa Powder
-
Use unsweetened natural cocoa powder, just a small amount for subtle chocolate notes.
-
Avoid Dutch-processed unless adjusting leavening — it alters the acidity balance.
Buttermilk
-
The key ingredient for tangy flavor and unbeatable moisture.
-
The acidity also reacts with baking soda for a tender crumb.
-
No buttermilk? Mix 1 cup milk + 1 tbsp vinegar or lemon juice.
Baking Soda + Vinegar
-
This combo gives the cake a slight lift and a fluffy, airy texture.
-
Vinegar also helps enhance the red color by activating the cocoa.
Butter & Oil
-
Butter adds flavor, while oil ensures the cake stays moist even when chilled.
-
The combination makes a rich, soft, and tender cake.
Sugar
-
Granulated sugar sweetens the batter and balances the tang.
Eggs
-
Add structure and richness to the batter.
-
Make sure they’re at room temperature for best incorporation.
Red Food Coloring
-
Classic liquid red food coloring gives that iconic hue.
-
You’ll need about 1–2 tablespoons. Gel food coloring also works and is more concentrated.
Vanilla Extract
-
Balances the cocoa and enhances overall flavor.
Cream Cheese Frosting
-
The classic pairing: tangy, sweet, and creamy.
-
Made with cream cheese, butter, powdered sugar, and vanilla.
Step-by-Step Instructions
1. Preheat and Prepare
-
Preheat oven to 350°F (175°C).
-
Grease and line two 8-inch round cake pans with parchment.
-
Alternatively: use a 9×13 pan or make cupcakes.
2. Sift Dry Ingredients
In a medium bowl, sift together:
-
2½ cups all-purpose flour
-
2 tbsp unsweetened cocoa powder
-
1 tsp baking soda
-
½ tsp salt
Set aside.
3. Mix Wet Ingredients
In a large bowl or stand mixer:
-
Cream together ½ cup unsalted butter (softened) and 1½ cups granulated sugar until light and fluffy (2–3 minutes).
Then mix in:
-
½ cup vegetable oil
-
2 large eggs, one at a time
-
1 tbsp red food coloring
-
1 tsp vanilla extract
-
1 tsp white vinegar
Mix until smooth and combined.
4. Add Buttermilk and Dry Ingredients
-
With the mixer on low, alternately add the dry ingredients and 1 cup buttermilk in 2–3 additions.
-
Mix until just combined — don’t overmix.
5. Bake
-
Divide batter evenly between pans.
-
Bake for 28–32 minutes, or until a toothpick comes out clean from the center.
-
Let cool in pans for 10 minutes, then transfer to wire racks to cool completely before frosting.
Cream Cheese Frosting Recipe
Ingredients:
-
8 oz cream cheese, softened
-
½ cup (1 stick) unsalted butter, softened
-
2½–3 cups powdered sugar
-
1 tsp vanilla extract
-
Pinch of salt
Instructions:
-
Beat cream cheese and butter until smooth and fluffy.
-
Add powdered sugar gradually and beat until thick and creamy.
-
Mix in vanilla and salt. Chill for 10–15 minutes before frosting if needed.
Tips, Variations & Substitutions
Pro Tips
-
Use room temperature ingredients to help the batter mix evenly.
-
Don’t skip the vinegar — it enhances the color and helps with rise.
-
Chill layers before frosting for cleaner assembly.
Variations
-
Cupcakes: Bake at 350°F for 18–20 minutes. Makes about 18–20 cupcakes.
-
Layered with berries: Add sliced strawberries or raspberries between cake layers for a fruity twist.
-
Naked cake style: Frost lightly on the outside for a rustic, semi-naked look.
Substitutions
-
No buttermilk? Use 1 cup whole milk + 1 tbsp white vinegar or lemon juice.
-
Dairy-free: Use dairy-free butter and cream cheese alternatives.
-
Natural coloring: Beetroot powder or juice can be used, but color and flavor may vary.
Serving Ideas & Occasions
This red velvet buttermilk cake is perfect for:
-
Valentine’s Day
-
Holiday gatherings
-
Weddings or anniversaries
-
Birthdays and showers
-
Or simply a weekend baking treat
Serve chilled or at room temperature with:
-
Extra cream cheese frosting
-
Fresh berries
-
A dusting of cocoa powder or red velvet crumbs on top
Nutritional & Health Notes
This cake is a rich dessert, best enjoyed as a treat.
Estimated per slice (1 of 12):
-
Calories: ~400–450
-
Fat: ~22g
-
Sugar: ~35g
-
Protein: ~4g
-
Carbs: ~45g
To lighten it:
-
Use Greek yogurt in place of some butter
-
Reduce powdered sugar in frosting
-
Make a single-layer version or cupcakes for smaller portions
FAQs
Q1: Can I make this cake ahead of time?
A1: Yes! Bake the layers up to 2 days in advance. Wrap tightly and store at room temperature or refrigerate. Frost just before serving.
Q2: Can I freeze red velvet cake?
A2: Absolutely. Freeze unfrosted layers wrapped in plastic and foil for up to 2 months. Thaw overnight in the fridge before frosting.
Q3: Why use both butter and oil?
A3: Butter adds flavor, while oil ensures the cake stays moist even when refrigerated — the perfect combo.
Q4: Why is vinegar used in red velvet cake?
A4: Vinegar reacts with baking soda and cocoa to lighten the crumb and boost the red color. It’s essential for texture and appearance.
Q5: Can I make this recipe gluten-free?
A5: Yes, use a 1:1 gluten-free flour blend. Texture may vary slightly, but it still bakes beautifully.
Q6: Can I use gel food coloring?
A6: Yes. Use ½ to 1 tsp gel food coloring depending on intensity. Gel is more concentrated than liquid.
Q7: How do I prevent red velvet cake from being dry?
A7: Use oil, buttermilk, and don’t overbake. Keep a close eye at the 28-minute mark and pull out as soon as a toothpick comes out clean.
PrintVelvet Cake Recipes – Buttermilk Red Velvet Layers
This moist and classic red velvet buttermilk cake features a soft, tender crumb, subtle cocoa flavor, and tangy cream cheese frosting — perfect for special occasions or everyday indulgence.
- Prep Time: 20 minutes
- Cook Time: 30 minutes
- Total Time: 50 minutes
- Yield: 12 servings 1x
Ingredients
-
2½ cups all-purpose flour
-
2 tbsp cocoa powder
-
1 tsp baking soda
-
½ tsp salt
-
½ cup unsalted butter, softened
-
1½ cups granulated sugar
-
½ cup vegetable oil
-
2 large eggs
-
1 tbsp red food coloring
-
1 tsp vanilla extract
-
1 tsp white vinegar
-
1 cup buttermilk
Instructions
-
Preheat oven to 350°F. Grease and line two 8-inch pans.
-
Sift flour, cocoa, baking soda, and salt. Set aside.
-
In a large bowl, cream butter and sugar. Add oil, eggs, food coloring, vanilla, and vinegar.
-
Alternately add flour mixture and buttermilk. Mix until smooth.
-
Divide batter and bake 28–32 minutes. Cool completely.
-
For frosting: beat cream cheese and butter until smooth. Add powdered sugar, vanilla, and salt.
-
Frost cooled cakes and decorate as desired.
Notes
Chill cake layers before frosting for best results. Store frosted cake in the fridge for up to 5 days.